Everyone (you too!) is encouraged to propose edits to the wiki pages to grow the quality of the wiki as a knowledge base. Just hit edit, and start typing and pasting. Your content will get automatically reviewed so you don’t have to worry about mistakes.
https://unofficialsf.com/wp-content/uploads/2022/09/largeUCSF-300x133.png00Alex Edelsteinhttps://unofficialsf.com/wp-content/uploads/2022/09/largeUCSF-300x133.pngAlex Edelstein2021-09-03 13:25:402021-09-03 13:25:47A New Home Page for Info about Flow Templates
The customer wanted to update several fields on the related Case that tracked whether the person responded to the latest survey, and then update the Case status appropriately based on a specific question’s response.
They also wanted to send an in-app alert to a Queue if the person responded extremely negatively to any of the numerical questions being asked in the Survey. So if they responded with a 0, 1, or 2 to the CSAT question, they wanted to know.
Using Custom Metadata / Custom Settings to Automate Specific Questions.
In the previous article we talked about the Survey data model and a sample scenario with one question and 3 choices. We’ll use that in this new flow. Remember how I said it’s important to understand the Survey data model? That was no joke – you will likely be lost if you don’t take time to understand it.
Just a caveat – this solution assumes you do not have Feedback Management, which has the super helpful Data Mapper solution which lets you do some of what Flow does, but without the Custom Metadata complexities introduced here. Feedback Management and Flow can live in tandem, however. If you need basic automations done in your system, Feedback Management is a great way to do that… However, if you need to do things like sending an in-app alert to a queue, or re-use automations across Surveys you’ll need some help from Flow.
I will say generically that if you have the same automation that needs to run for every survey in your system or is shared across many surveys, I recommend a Flow-first approach. This allows you to make changes to your automation in one place vs. doing it on a per-survey basis. Again, though it may be worth sacrificing
Flow Entry / Early Conditions
I won’t go element by element unless demand arises, but I do want to call out a few checks you can make.
In the rare scenario where a Survey isn’t complete, we likely want to check that the survey is actually completed:
Next up we check that the Question Responses’s survey name matches what we’re expecting. That can be done by traversing upward: $Record.SurveyVersion.Name (or $Record.SurveyVersion.Survey.Name). We can’t do that in our entry criteria (yet), so we have to do it here in a decision node.
In my example below I actually have a custom lookup on Survey Invitation called ‘Related Case’, and I plan to update some fields on the Case, so I ensure there is actually a value there. That can be done by traversing upward as well: $Record.SurveyInvitation.Related_Case__c
Set Case Fields Based on the Survey Response
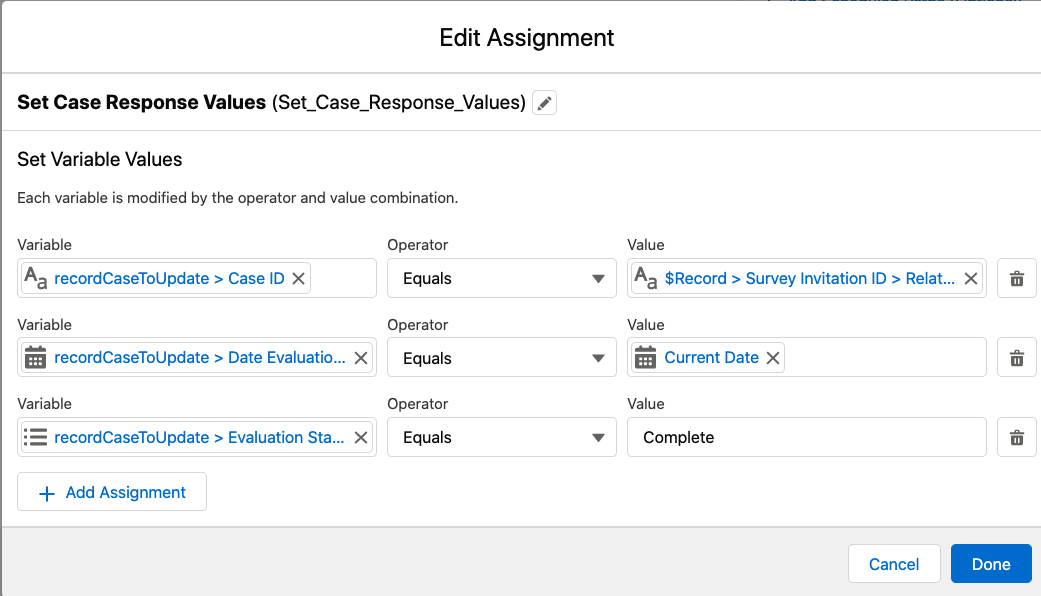
Next up is where I actually set some values on the related case to track the survey completion at the Case leve (not the Invitation/Response level). These fields on Case track that an evaluation was completed and when it was completed.
Notice I don’t do an Update here – I use an assignment to save on DML as I will likely be making more changes to the case downstream in the Flow. Efficiency!
As Anakin Skywalker once said, “This is where the fun begins”… and hopefully not “I’ve got a bad feeling about this”.
The first thing we want to do is grab all of the Custom Metadata Mappings related to this survey.
Step 1
Do a null check on the results just to make sure you’ve got some records, then things get a bit more interesting and purely based on your use case and what you’re trying to do.
In my Flow I looked for any questions that were specifically Choice questions (so no CSAT/numerical questions). This was done by checking that the QuestionChoiceId field (the lookup to the actual Choice in the question) is not null:
Step 2
My survey only had 1 possible question with a choice, so you may want to consider adding more criteria to future proof things.
Step 3 & 4
Next up is where I wish we had more collection processing power without assistance of invocables, but alas, this was my solution. I looped over the CMT mapping records I grabbed in Step 1, then I did another loop (GASP!) on the collection of responses above. I felt comfortable doing this because I was only ever going to have 1 response record x 3 mapping records, so there was no risk of hitting the dreaded 2,000 iteration limit.
Note: This is needed because we can’t reference the DeveloperName of the responses’s related question record on the left side of a Get records element yet. Another added complexity is that we cannot directly reference CMT records like you can in Process Builder, so we have to retrieve them with Get elements.
Step 5
In the first decision we match up a Custom Metadata record that stores the Question Choice DeveloperName with the response’s Question Choice DeveloperName. Once we get that match, we move forward.
In the loop I check to see that the Response record’s related Choice Matches a particular outcome stored in the Custom Metadata field Question Choice Text. This is where we route the flow based on the automation we want.
From there, the world’s your oyster. In my flow, I had 3 outcomes that did different things to the case. Remember how we used an assignment element for the Case earlier instead of an Update? That’s because we’re doing another update to it here:
Summary (In Words)
Check that the Response’s Survey ($Record.SurveyVersion.DeveloperName) is the one you want to automate.
Get all of the Survey Automation Mapping custom metadata records for the particular survey.
Get all of the SurveyQuestionResponse records that have a related Choice record.
Loop over the CMT Mapping records
Loop over the found SurveyQuestionResponse that are choices (loop within a loop only if the expected responses with choices is tiny)
In the loop, do a decision to match up the looped Custom Metadata record that stores the Question Choice DeveloperName with the 2nd loop’s Question Choice DeveloperName
In the next decision, create your decision paths for each of the results you want to handle using the Question_Choice_Text__c field on the custom metadata record
Do your thang!
Send an Alert to a Queue on a Poor Responses
Whew!
Okay this one’s a bit easier. A lot easier, actually.
One nifty thing I’ve done is setting up an in-app alert to go to a specific queue when somebody responds poorly (1,2, or 3 out of 10) to a CSAT question.
Step 1
Grab any question responses that have a specific numerical value tied to it. Note that I use the Id of the record that triggered the Flow (the Survey Response’s record id)
Step 2
Do your null/empty check on this step ^
Step 3 (Optional)
Here we do some stuff to the case if needed.
I actually set the case status to ‘Problem’ if we found any matching results.
Step 4 (Optional)
Loop over the questions to store the question text
We Loop over the question responses to create a text variable of all of the question names for the alert we’ll make. This will go into the alert body.
The left side is a Text Collection variable of your choosing, the right side is: {!Loop_Over_Question_Names.Question.Name}
If you’re a big USF fan like me, you’ll have the handy ExtractStringsFromCollection action to do this for you, but if you don’t want to use that, you can go this route.
Your Notification Body can be a text template that references your text collection variable of the questions that were responded to poorly.
Step 6 – Do your Last Updates
We finally update the Case with all the various updates made in various assignment elements throughout the Flow:
And you’re done! I’d love to hear everyone’s thoughts on this – I know it’s a bit complex but once you get it going it can really scale quite well and you won’t need to make edits to your Flows if you make text changes to your Surveys.
https://unofficialsf.com/wp-content/uploads/2022/09/largeUCSF-300x133.png00Adam Whitehttps://unofficialsf.com/wp-content/uploads/2022/09/largeUCSF-300x133.pngAdam White2021-09-02 06:32:532021-09-02 06:32:59How I Built This: Drive Your Survey Automations with Flow – Part 2
I’ve seen quite a number of people asking how to drive automations using Salesforce Surveys and Flow and thought I would share a solution I’ve used in a recent project that utilizes Custom Metadata records to intelligently drive automation based on specific responses.
First, I will say that for basic automations the Surveys add-on called Feedback Management will handle most scenarios for you – simply create a data map for each survey and perform a series of automations in your org. For more advanced automation, or if you can’t purchase Feedback Management, you may want more control and flexibility with the help of Flow.
Secondly, I will also say this is not the most basic solution. This takes some time to digest and if you want to sacrifice scalability for speed, you don’t need Custom Metadata records… however you will need to be careful of any changes made to the survey and the logic used in your flow that may look at the question text. Understanding this model will serve you well in the long run – both in knowing how to use Custom Metadata and in understanding the Survey data model.
The Survey Data Model
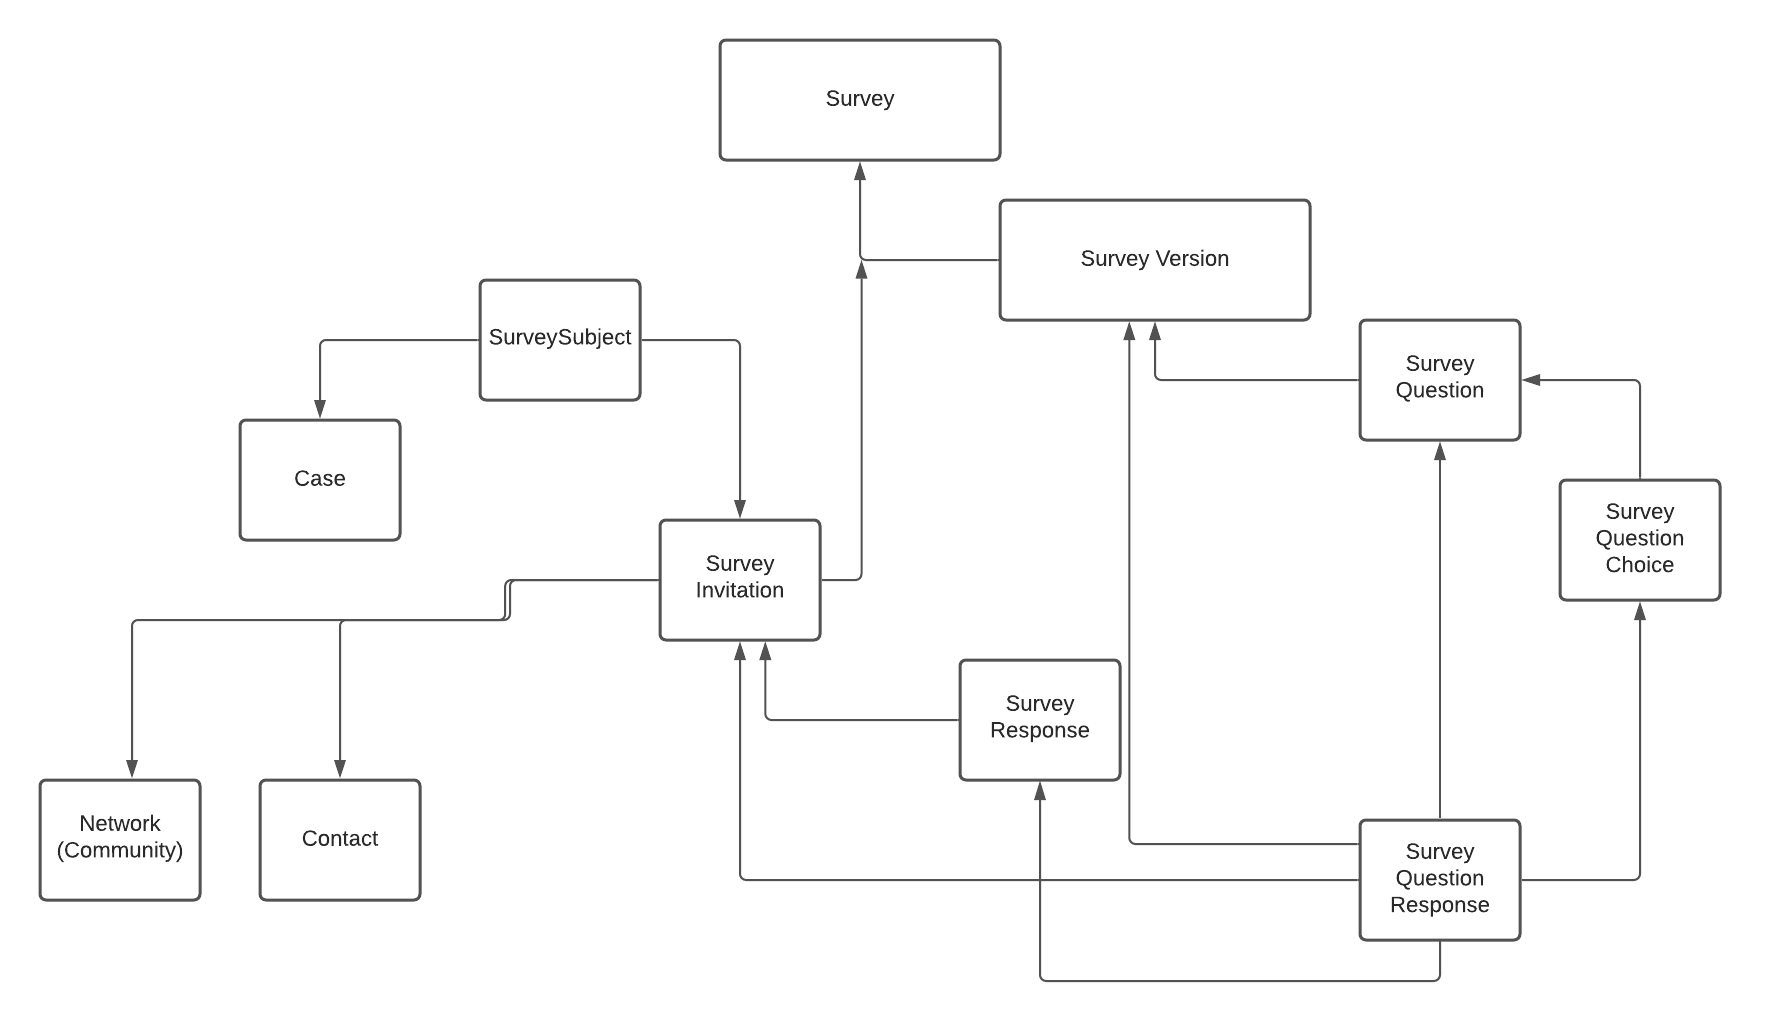
It’s critical to understand the Survey Data model in order to understand the Flow automation I built to handle survey responses. When a survey taker responds, a Survey Response record is made, with a series of Survey Question Responses for each responded question.
Please excuse this extremely un-architechty diagram.
Survey: This is the actual survey you create and has multiple versions. Everything eventually rolls up to this.
Survey Version: This is where we track the various versions of the related survey. Think of this as a similar version of ContentDocument / ContentVersion.
Survey Question: The questions that you create on your survey each have their own Question record that all relate to the Survey and Survey Version.
Survey Question Choice:If your question has multiple options (picklist, for example), you will have multiple Survey Question Choice records that all relate to a single Survey Question.
Invitations & Responses
Now we get into when a survey taker responds to the survey.
Survey Invitation: This is where the unique URL is made for the survey. This is also where you specify other details like if the user needs to be logged in to respond, and whether You can add custom fields to this.
Survey Subject:A junction object that connects the survey response to another object. You can add custom fields here. This typically grants visibility to the survey.
Survey Response:Represents information about a participant’s response to a survey, such as the status of the response, the participant’s location, and when the survey was completed.
Survey Question Response: This is the actual response to a question. You can choose to drive your automations on this object, or Survey Response.
Take this SOQL query for example that looks at the out of the box Customer Satisfaction Survey choices. SurveyQuestionChoice looks up to SurveyVersion and SurveyQuestion. We use the relationship fields just to demonstrate how they all relate.
SELECT Id,Name,SurveyVersion.Name,Question.Name
FROM SurveyQuestionChoice
Where SurveyVersion.Name = ‘Customer Satisfaction’
Which object do you select as your starting point?
The first thing you need to consider is whether you want your automation to run when a Survey Response is created vs. when a Question Response (a response to an individual question) is created. Both have valid use cases.
Trigger on Survey Response
Trigger your flow here when you only want your Flow to fire once.
If you have a ton of questions with potentially complex logic and lots of looping, I would suggest starting here.
If you really only care that somebody has submitted a survey and you want to track its status elsewhere (like on a Case), go this route. Otherwise, you will needlessly fire off a Flow for every single question.
Trigger on Survey Question Response
Trigger your flow when you want your Flow to fire for every question.
This works well when you don’t have a ton of questions and you don’t necessarily care about doing something with the status of the overall survey.
If you don’t necessarily care what happens on submission and you’re okay with multiple instances of your automation firing, choose this object as your starting point.
Be wary of going this route if you have something like 50+ questions though, you could run into limit issues if your flow is complex and has lots of loops / processing.
Custom Metadata: Survey Automation Mappings
The main thing that drives this Flow is the Survey Automation Mapping custom metadata object. In it, we store the developernames of specific Choice and Survey records. This allows us to avoid hard-coding responses in decision nodes in our Flow to drive automation on specific responses to questions. This means that we can change the answers to questions in surveys without worrying about also updating the Flow.
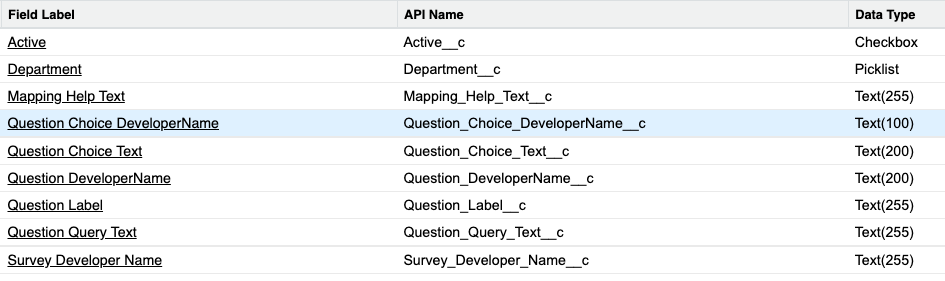
Here are the fields:
Active: Keeps the mapping activate. Generally always a good idea to have an Active flag in any CMT record.
Department: Not needed for generic use, but could provide for department-specific automations for the same survey responses.
Mapping Help Text: Provides the admin the ability to provide context / help for the mapping record like where and why it’s used
Question Choice DeveloperName: Stores the developer name of the Question Choice – we do this so we dont have to reference static text in the automation.
Question Choice Text: Stores the answer response text – used in the decision node in the Survey Response Flow
Question Label: Optional. Used more as a handy reference when viewing mappings to know which question is being referenced in this CMT record.
Question Query Text: Used by Flow to retrieve the right CMT record and get the developer name of the question being queried. For example ‘Was_Request_Met’ AND Survey DeveloperName = ‘Surveyname’
Survey Developer Name: Stores the developer name of the survey containing the mapping
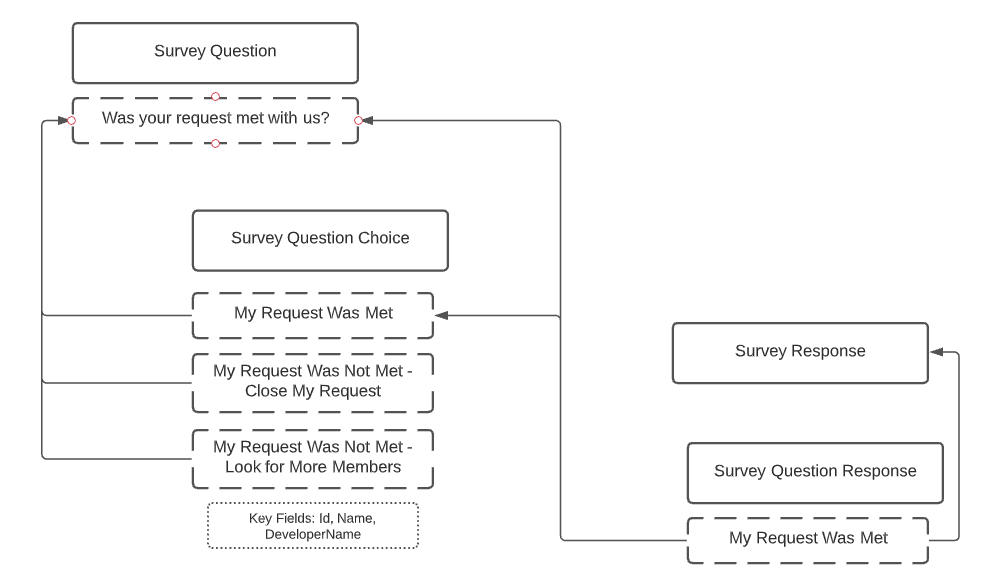
Each response to a ‘Choice’ type question has a related Choice record for each option for that question that has a flexible label, what the customer sees, but a static DeveloperName. We use that DeveloperName in the custom metadata record. See below for an example of how the data model looks with Questions, Choices, and Responses.
Let’s take a scenario where there is a question on a survey that asks ‘Was your request met with us’ with 3 possible choices (see below).
Getting the DeveloperName of Questions & Surveys
You will need to use SOQL (Dev Console, Workbench) or Salesforce Inspector’s (a Chrome Extension) ‘View Data’ feature to see a survey/question/choice record’s DeveloperName. VS Code also has some SOQL functionality.
Here is how you’d query for everything you need to create your Metadata Mappings:
WHERE SurveyVersion.VersionNumber = (use the version # you want here) AND SurveyVersion.Name = ‘Survey Name Here’
ORDER BY Name
Using this, we can create some mapping records:
Active
Label
Survey Automation Mapping Name
Mapping Help Text
Question DeveloperName
Question Label
Question Query Text
Question Choice Text
Survey Developer Name
Question Choice DeveloperName
TRUE
Member Feedback – Request Not Met
Member_Feedback_Request_Not_Met
Used to automate Case field ‘Request Status’ to drive if the case has to be re-opened or can be closed
q_963113e4_d736_4a0d_b992_7f42bdb540e1
Was your request met with us?
Was_Request_Met
Not_Met_Close_Case
customer_satisfaction_survey
c_315e2827_6ffc_49d4_93b9_54b55cd356
TRUE
Member Feedback – Request Not Met
Member_Feedback_Request_Met
Used to automate Case field ‘Request Status’ to drive if the case has to be re-opened or can be closed
q_963113e4_d736_4a0d_b992_7f42bdb540e1
Was your request met with us?
Was_Request_Met
Request_Met
customer_satisfaction_survey
c_69a6ba6f_0aec_4f1d_8283_feff74543339
Next up – we’ll look at using these custom metadata records to drive specific responses in our Flow
https://unofficialsf.com/wp-content/uploads/2022/09/largeUCSF-300x133.png00Adam Whitehttps://unofficialsf.com/wp-content/uploads/2022/09/largeUCSF-300x133.pngAdam White2021-09-02 06:32:202021-09-02 06:45:17How I Built This: Drive Your Survey Automations with Flow – Part 1
The Flowcast is an attempt to summarize the key posts and community developments around Flow in a ‘bite-size’ format each month. I just posted the newest Flowcast for July & August – I hope you enjoy it!
Check the video comments for hyperlinks to the various articles.
https://unofficialsf.com/wp-content/uploads/2022/09/largeUCSF-300x133.png00Adam Whitehttps://unofficialsf.com/wp-content/uploads/2022/09/largeUCSF-300x133.pngAdam White2021-09-01 15:17:142021-09-01 15:17:14July and August Community Flowcast
Now Available sendBetterEmail scheduled release 2.2 Unlocked (Ver 2.1.7) . Enhancements and improvements; #855 allow installation when enhanced email not enabled and #862 add to Category “Email” in new action insert.
AppOmni publishes a commercial solutions that provides a host of security tools. Examples include Showing Who Has Access to What and logging things that don’t normally get logged by Salesforce Shield. They recently published a report called Understanding Salesforce Flows and Common Security Risks.
It discusses many elements of Flow security, some of which have not gotten much attention. For example, they point out uses of Conditional Field Visibility that can lead to sensitive information being accessible:
Useful stuff!
https://unofficialsf.com/wp-content/uploads/2022/09/largeUCSF-300x133.png00Alex Edelsteinhttps://unofficialsf.com/wp-content/uploads/2022/09/largeUCSF-300x133.pngAlex Edelstein2021-08-30 20:39:152021-08-30 20:39:24From AppOmni – An Overview of Flow Security
https://unofficialsf.com/wp-content/uploads/2022/09/largeUCSF-300x133.png00Alex Edelsteinhttps://unofficialsf.com/wp-content/uploads/2022/09/largeUCSF-300x133.pngAlex Edelstein2021-08-29 13:32:072021-08-29 13:32:12Flexcard is now available in Screen Components Base Pack
This is a new FAQ designed to answer incoming questions about NBA Licensing.
Question 1 In the SFDC Company Setup, there are two kinds of licenses/entitlements for Next Best Action?
Einstein Next Best Action – Unlimited Requests (Permission Set License) –
Maximum Next Best Action Requests available (Usage Based Entitlement)
Why are there two?
Unlimited Request licenses are optimal for users that use a lot of NBA, such as service agents who have the NBA component generating recommendations on a case page.For less frequent use of NBA, or for users where Service Cloud Einstein doesn’t make sense, the Next Best Action Unlimited Requests SKU sells request capacity. The two forms of licensing are needed to cover all customer scenarios.
Question 2
In my Company Information, for “Einstein Next Best Action – Unlimited Requests” I’m seeing 9,196 licenses. But the “Maximum Next Best Action Requests available” shows zero used. How do I interpret that?
That means that the org has 9,196 Unlimited Request licenses that it can allocate to org Users. When a User has an Unlimited Request license assigned to them, their usage is not counted against the allocation of available Requests.
When a User makes an NBA request and they do not have an Unlimited Request license, their request is counted against the monthly Maximum Next Best Action Requests Available. If Maximum Next Best Action Requests Available shows zero, that means that all available request capacity for the current month has been consumed by these users that do not have an Unlimited Request license. The amount of available requests resets each month and includes a 5000 per-org monthly freemium allocation, plus any request capacity stemming from the purchase of the Aditional Next Best Action Requests skus. Note that 5000 requests can go very quickly and is not intended to be more than a trial/evaluation/testing allocation.
Question 3
The number of “Einstein Next Best Action – Unlimited Requests” licenses I’m seeing in my Company Information is higher than I would expect to see. I don’t remember buying that many. Where did they come from?
NBA Unlimited Request license is included in the Embedded ISV Platform license, with a contractural limitation that limits the use of that license to the ISV’s specific activities. For example, suppose PetCRM ISV, maker of a Salesforce enhancement that provides CRM services for small household pets, uses the Embedded ISV Platform license to provide Salesforce licensing to their customers. PetCRM is entitled to use NBA in its ISV solution. Its customers can use that built-in NBA but are not allowed to use those unlimited licenses for other NBA usage. To determine how many NBA Unlimited REquest licenses are constrained in this way, determine the number of Embedded ISV Platform licenses in the org.
Question 4
I have Sales Cloud users and want to sell them NBA. What are my options?
At this time, the unlimited NBA license is only available in Service Cloud Einstein. If the Sales Cloud user can be provisioned with a Service Cloud Einstein PSL, they can buy it and use unlimited requests. For other uses, use the Einstein Next Best Action – Additional Requests SKU
https://unofficialsf.com/wp-content/uploads/2022/09/largeUCSF-300x133.png00Alex Edelsteinhttps://unofficialsf.com/wp-content/uploads/2022/09/largeUCSF-300x133.pngAlex Edelstein2021-08-24 14:51:392021-12-22 06:52:55Next Best Action Licensing FAQ
“By default, guest users can’t upload files and don’t have access to objects and their associated records.
To enable guest users to upload files, enable the org preference Allow site guest users to upload files. However, even if you enable this setting, guest users can’t upload files to a record unless guest user sharing rules are in place.”
Salesforce provides components a way to publish an optional bypass for the sharing rule restriction, which we have implemented in this release. Setting this input to True activates that bypass. For more information, see Developer Note – Bypass Community Sharing Rules, below
Permission Set
IMPORTANT: This package now installs a permission set named “File Upload Improved”. Make sure to assign it to any community users to whom you want to grant this upload capability.
Developer Note – Bypass Community Sharing Rules
To understand how we implemented the Bypass Community Sharing rules, we encourage you to read the SFDC documentation linked above and to review the new FileUploadImprovedHelper Apex class.
At a high level, we are encrypting the Related Record Id and passing it into the File Upload component via the file-field-name and the file-field-value. onuploadfinished the class is querying the newly created ContentVersions, decrypting the Related Record Id which has been populated in Guest_Record_fileupload__c, and creating ContentDocumentLinks from the uploaded file to the record.
https://unofficialsf.com/wp-content/uploads/2022/09/largeUCSF-300x133.png00Ryan Mercerhttps://unofficialsf.com/wp-content/uploads/2022/09/largeUCSF-300x133.pngRyan Mercer2021-08-23 07:44:332021-11-08 11:59:36From Ryan Mercer: Several Great Improvements to File Upload Improved