We encourage all users to upgrade File Upload Improved to take advantage of a new UI and several bug fixes.
UI Updates
The files now appear above the Upload Files box. Depending on your user’s device size, the files will either render in two columns…
… or in one column.
Internal users can click the blue file name for a preview of the newly uploaded file.
This feature is available only to internal users. If a community user clicks the link, nothing will happen.
Uploaded files will now not disappear if a validation error from another component on the screen is thrown (or if Users return to the screen with the File Upload Improved screen component).
ACTION REQUIRED: In the component configuration, you’ll see a field {!$Flow.InterviewGuid}. Admins should copy the label into the input text field like this:
If you have multiple File Upload Improved screen components IN THE SAME FLOW, you should prepend each component’s {!$Flow.InterviewGuid} with something else like ‘1’ and ‘2’, for example:
Unauthenticated guest users will now be able to immediately delete files that they just uploaded.
A bug in the previous version of File Upload Improved prevented unauthenticated guest users from deleting files that they just uploaded.
https://unofficialsf.com/wp-content/uploads/2022/09/largeUCSF-300x133.png00Ryan Mercerhttps://unofficialsf.com/wp-content/uploads/2022/09/largeUCSF-300x133.pngRyan Mercer2021-09-30 15:42:502021-11-08 12:01:18From Ryan Mercer: Version 1.4 of File Upload Improved brings enhanced UI updates and several bug fixes
Note: The opinions here are those of the author and not those of Salesforce
In Salesforce’s Global Public Sector, we often delight Government customers who up until now have only dreamed of adding mobile capabilities to their operations. A great use case recently came from the U.S. National Weather Service. NWS relies on tens of thousands of volunteer weather spotters across the country who phone in weather conditions to various local branch offices across the nation. We showed them how we could automate the collection of the spotter reports with Flow and a couple of custom Lightning Web Components that retrieve and work with geolocation values returned by mobile devices.
Here are some images of the component in a flow embedded in a Salesforce Experience site on my mobile phone:
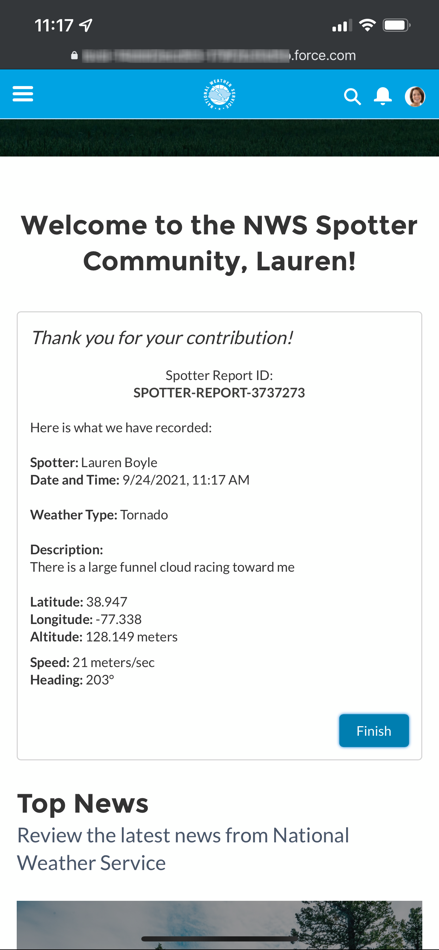
First, the mobile device asks for permission to use the spotter’s current location. Once granted, the component silently grabs the geolocation information from her phone while the spotter fills in the rest of the form in the flow. Finally, the confirmation page displays the information from the Flow-created spotter report record, showing the geolocation information pulled from the phone.
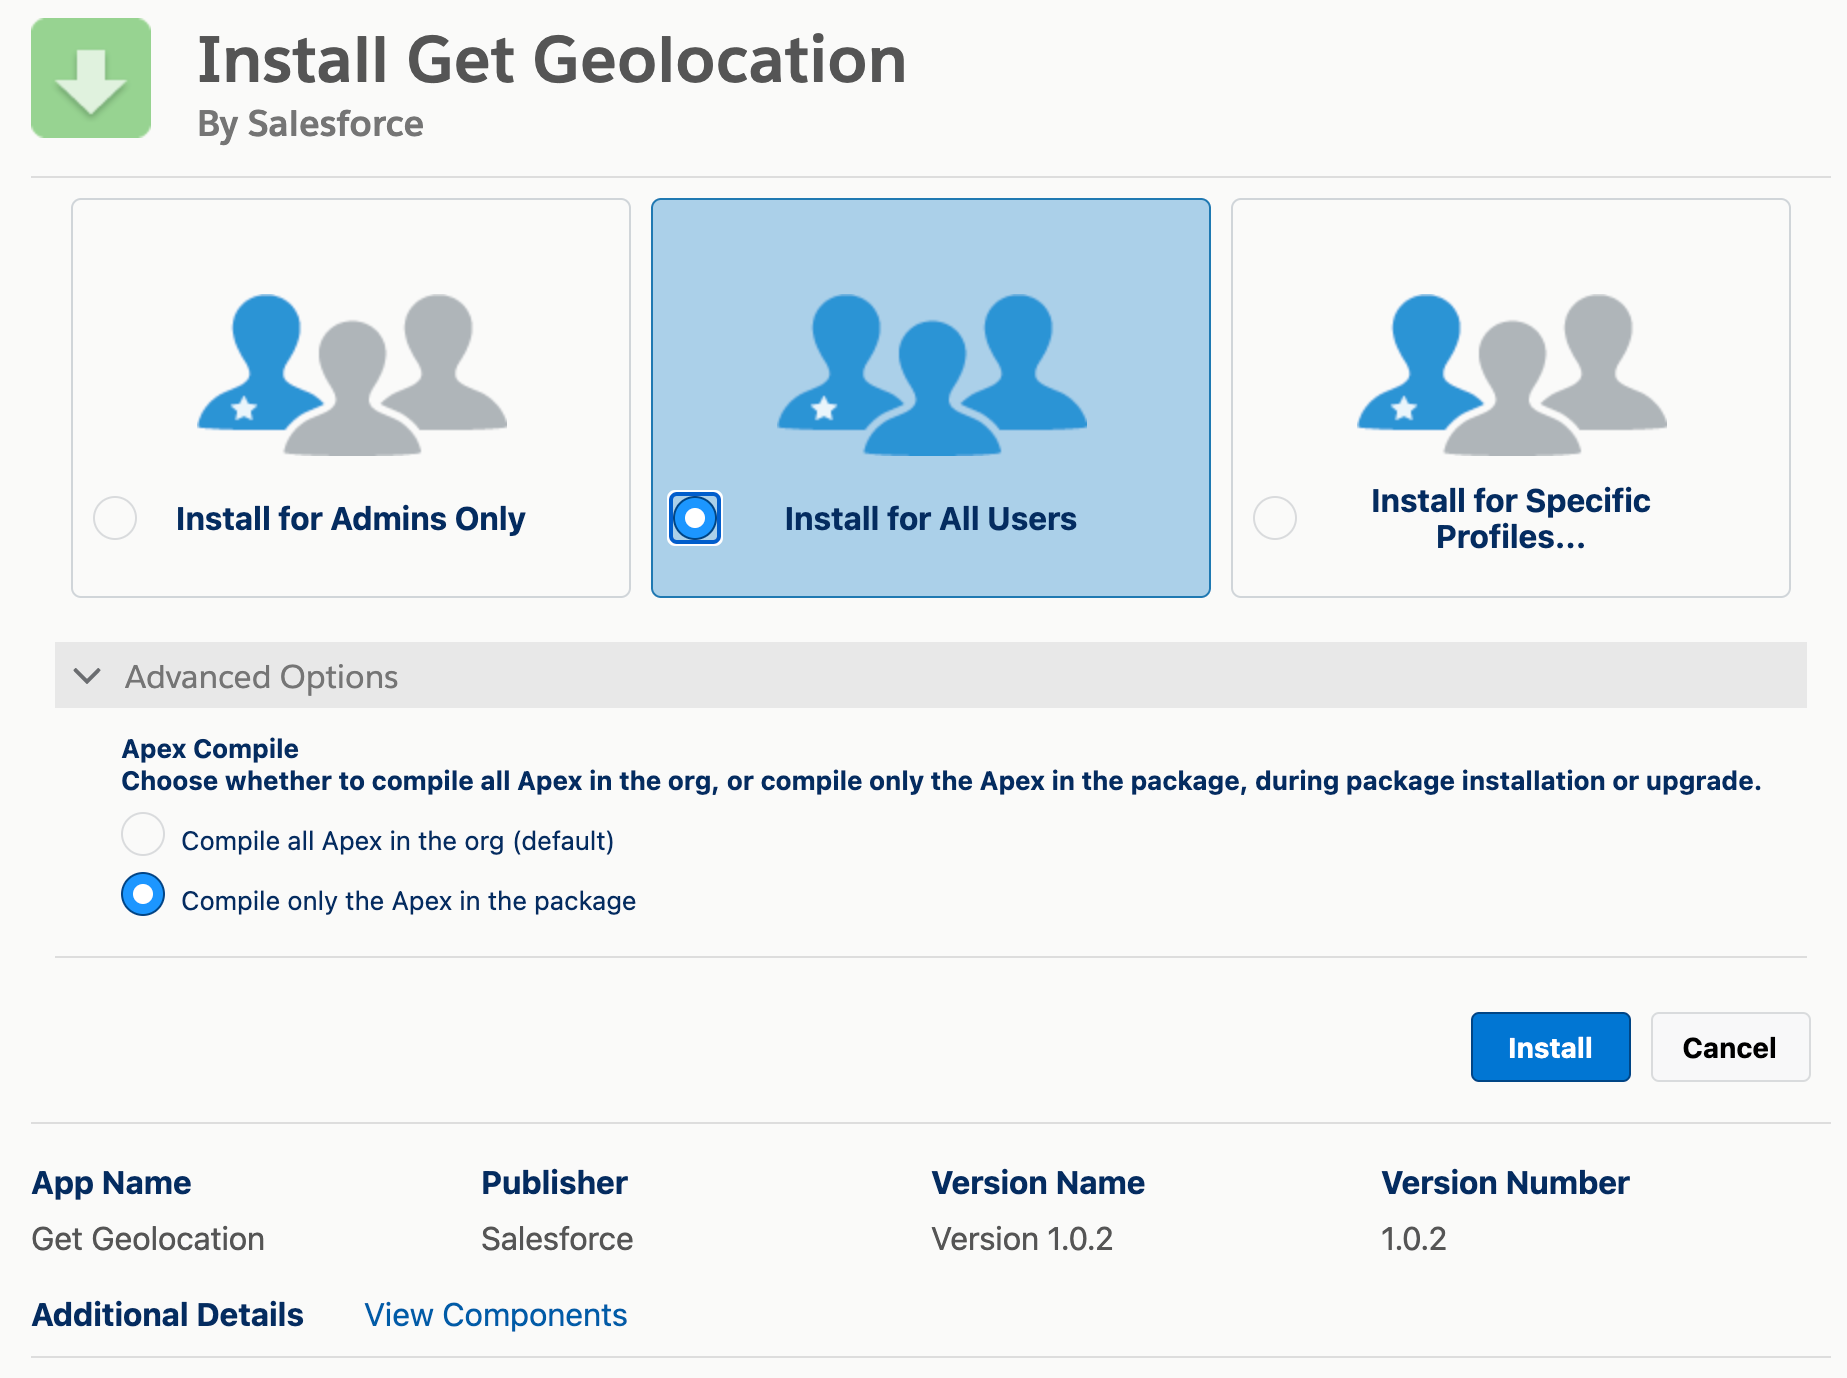
Once everything is installed in the org, you can add the geolocation component to your flow simply by dragging it onto the flow builder canvas from the “Custom” section of flow components. Note that by default the component does not display anything; it silently obtains the geolocation when the screen containing the component is shown in the flow. In the component’s configuration section, you can instead choose to display a map in the component showing your current location and an initial zoom level for that map. Also, by default, the component quietly fails if the component cannot determine the geolocation (if, for example, you choose not grant access to your geolocation or if the device does not support it). You can enable error messages for debugging purposes if you wish.
The component will return values for latitude and longitude (as decimal degrees), altitude (in meters relative to sea level), speed (in meters/sec), and heading (in degrees, with 0° representing true north).
Note: The speed and heading are only filled in when you are moving. If you wish to show the geolocation values in your flow, you can place the speed and heading values in a Display Text component with a visibility rule that tests to see if the speed value returned by the component is null.
The package contains an example flow that you can clone and use as a template for your own use cases.
I have tested this component on my iPhone and my Mac laptop, but since I am using standard web APIs, it should work on any other device that supports geolocation as well. I would be very interested to hear about your use cases below.
Bonus Component
The coordinates returned by this component make a fantastic way to keep track of records using Salesforce Maps. I also wrote a quick-and-dirty LWC to display a map of nearby records that you can place in a Salesforce record page for objects containing one or more geolocation fields. For my NWS demo, I showed nearby weather spotter reports:
To find out more about this component or to install it in your own org, please see the instructions on this GitHub page.
https://unofficialsf.com/wp-content/uploads/2022/09/largeUCSF-300x133.png00Alex Edelsteinhttps://unofficialsf.com/wp-content/uploads/2022/09/largeUCSF-300x133.pngAlex Edelstein2021-09-30 11:02:232021-09-30 11:02:33From John Meyer: Flows on Salesforce Mobile that Use Your Phone’s Location Sensors
The Serialize/Deserialize package is useful for use cases like passing records into a flow when the flow is invoked via a REST call. In that kind of situation, the inputs to the flow have to be strings and serialization converts records and record collections to strings. This is often paired with a deserialization action at the beginning of the invoked flow that converts the incoming string back into records or record collections.
With version 1.1, you can now pass a collection of records in in addition to a single record, and if you provide a json array to deserialize, you can get a collection of records out (in addition to the original support for a single record.
https://unofficialsf.com/wp-content/uploads/2022/09/largeUCSF-300x133.png00Alex Edelsteinhttps://unofficialsf.com/wp-content/uploads/2022/09/largeUCSF-300x133.pngAlex Edelstein2021-09-25 12:48:012021-09-25 12:48:04Seralize/Deserialize Now Handles Collections of Records
Editor’s Note: UnofficialSF is pleased to enable commercial creators of Flow extensions like Centro to introduce their products and demonstrate useful use cases. One of our goals is to see a rich tier of commercial solutions in addition to the many free extensions that will continue to be available.
Centro leverages the power of Salesforce Flows to automate Slack workflows in conjunction with Slack Workflow builder to create powerful no-code automations between the platforms. Our tools work together with our UI elements that we surface natively on both platforms. For example, our Salesforce Lightning Component displays all linked channels and conversations while our Slack Message Block displays fields from the Compact Layout, related records, and custom buttons. Some use cases we typically hear about:
Automate the creation of a channel and give context to the team. For example, an opportunity closes and you want to create an implementation channel for the delivery team to act on with the right context.
Send out Approval requests in Slack with the Quote document attached.
Engagement manager, using advanced Slack Workflow and Salesforce Flow. One application of this would be: Someone joins a channel, and you want to bring actions and material from Salesforce, for example, Onboarding a partner in Slack Connect. Custom actions trigger Salesforce Flows, which update or create records.
We’ll be showing the Engagement Manager use case later in this article, here’s the overview video demo: https://youtu.be/rXUP3lhxAHQ
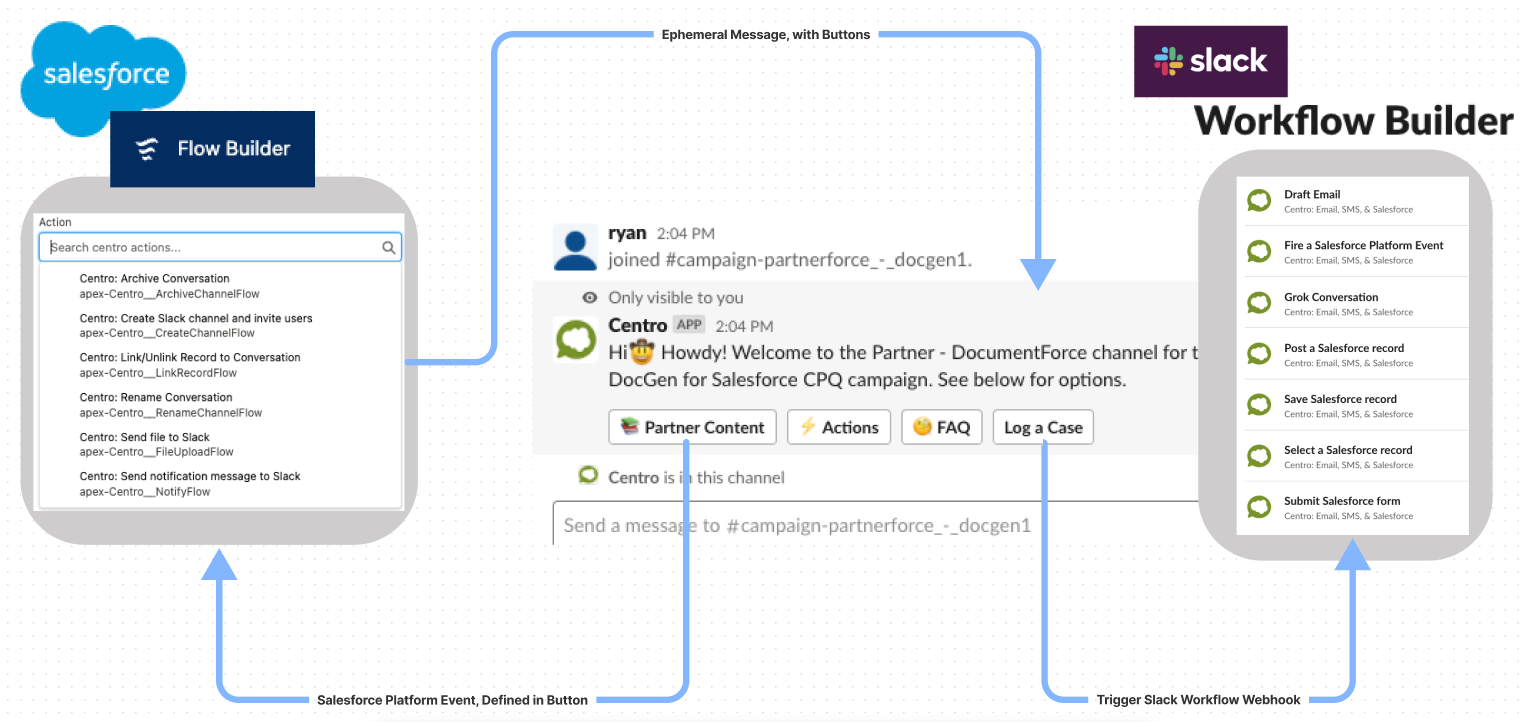
Centro also integrates directly with Slack Workflow Builder. Centro provides key Salesforce Workflow steps there as well, such as searching, updating, creating, and firing Platform Events back in Salesforce. These platform events can then be used to trigger flows, creating a sustainable cycle. See below:
Centro also provides a Form builder where admins create a Form in Slack tied to Salesforce fields. Field labels can be customized, fields can be specified as required or optional (while supporting object-level required fields), and pre-filling default values in hidden fields. Users in Slack Connect channels can fill out a Case without having a login to Salesforce, for example.
Surveying the Tools
First, let’s get oriented with the automation elements. After installing Centro, you’ll find the following actions available for use in Salesforce Flow, you’ll find these elements:
Archive Conversation – Does what it sounds like, provides a Slack Channel ID and Centro will Archive the channel. This is useful for tackling Channel proliferation for “quick” conversations. This is in addition to Centro’s out-of-box Archive Channel reminders when creating a Slack Channel manually using our Lightning Web Component
Create Channel and Invite Users – This element will create a Slack channel and invite Salesforce users to the channel. Additionally, you may invite Contacts, Leads, or a List of email addresses to a newly created Slack Connect Channel.
Link/Unlink Channel – Associated a Slack channel to a Salesforce Record. Once linked, the channel will appear in the Lightning Web Component.
Rename Channel – Given a Slack Channel ID and a valid Slack name, give a channel a new name. Useful for when a Channel topic has changed from say Deal Progress to Implementation.
Send File to Slack – Given a Salesforce File (Content Version ID, specifically) and a Slack channel ID, post that file to Salesforce.
Notification Message – Our most used and robust element. This deserves a deeper dive. You may specify a Channel statically or dynamically, post a Salesforce File or Report a custom message, and custom buttons with dynamic button behavior such as go to a URL, fire a Platform Event, or start a Slack Workflow.
For the Slack Workflow Steps, let’s look at our Salesforce options:
Save Salesforce record – This step is dual purpose, if passed a Record ID the step will perform an Update, when left blank the step will create a new record.
Select a Salesforce record – Prompts the user to search for a specific record, either using a SOSL search or confined to a specific object.
Post a Salesforce record – given a valid Salesforce record ID, post the Record Details using Centro’s Record Block format
Fire Salesforce Platform Event – Sends a Centro Platform Event over to Salesforce. The platform even includes things like Slack User Id, Member Name, Channel Id, and more.
Submit Salesforce Form – Create a form-like experience for users to enter data and create a new record based on the data keyed in. Useful for creating a Form in a Slack Connect channel and we’ll be using this in this example. Filtered lookups, required fields, and custom labels may all be defined.
Grok – Centro’s AI engine leveraging GPT-3 to summarize a channel and post the results either to Slack or Save to Salesforce. A good example might be Case Resolutions or Activity Logs.
Use Case: Automatic Slack Connect Onboarding with Flow and Slack
Today we’ll focus on an interesting use case that involves Salesforce Flow and Slack Workflow Steps, all from Centro. When using Centro, we take care of the App Scopes, Salesforce user permissions, Field Level Security, and all the other intricacies of setting up an app. For that convenience and no-code ability, Centro is a paid app. There are plenty of good free packages, such as Unofficial Salesforce’s Slack Flow Elements if you want to get your feet wet! You’ll need to create a Slack app, understand Scopes, and user authentication when using those tools.
Let’s get started! The use case today will be: Lakeview Insurance is leveraging Slack Connect to connect with its partners and have an asynchronous dialog with the staff to register deals, log cases, and discuss the partnership. One of its partners, DocumentForce has members come and go, and regularly need to access this Slack Connect channel. Rather than greet every member and onboard each new person from DocumentForce, Lakeview would like to have some automation to cover the basics! That is, for each new member that joins:
Send an ephemeral greeting welcoming to the space, and set expectations
Allow the new member to create a Case with restricted fields to fill in
Read up on a FAQ that’s maintained as a Knowledge Article in Salesforce
In addition, Lakeview wants to capture the new member as a new Contact, and record their engagement when buttons are clicked in Slack.
First, we’ll create a linked Slack Channel to the partner Account. We’ll leverage Centro’s LWC for this. Notice we’ve had other conversations linked to this channel. This lets others review and contribute existing Slack channels:
Let’s create a Slack Connect Channel. The “Create or Link Channel” button presents us with these options:
Note you can invite internal members and also include Salesforce Contacts or emails. Internal members will be automatically added, and the external members will be invited via Slack Connect.
Now we want to have a welcome message when users join the channel. We’ve crafted a Slack Workflow to handle Member On-Join events that works across multiple channels (Slack Workflows are normally relegated to a single channel, this webhook will work in any channel Centro bot is in). The workflow is configured as follows:
Note that Centro provides a “Fire a Salesforce Platform Event” step, configured in the case as shown:
This will fire anytime someone joins a channel, and pass along to Salesforce the Channel ID, Slack User ID and Member Name. Note that the API name allows multiple unique platform events to be handled in a single Platform Event Triggered Flow!
Now that we’ve captured who joined the channel, let’s handle the Centro Platform event. Since Centro can create Salesforce Platform events from Buttons attached to Slack Messages and from Slack Workflows, we recommend creating a Platform Triggered Flow which we’ll call Centro Platform Event Handler. In this way, button presses from Slack can be managed in a single flow. See below:
This flow is simple: triggered off the provided Centro Platform Event record. The Decision element will be conditional from the Centro API names we provided, each branch will handle the resulting logic!
This example is using the Salesforce Campaign object to provide content to the joining user in the Slack channel. Additionally, we can add the members of the campaign, and keep track of what was clicked for analytics on messaging and actions work the best. Since it’s in Salesforce, it’s easy to report on! We can also capture the user joining the channel from Slack Connect as a new Contact or Lead.
The Get Records from the campaign is simply getting the Welcome Message content. The Assignment element is setting things like the channel, member ID, and campaign content for our welcome message:
Now that we have our variables set, we’re ready to post our welcome message to the joining user. We’re going to do this ephemerally so that we don’t interrupt the ongoing conversation. This is the Action element with the provided Centro “Post Notification Message”:
Let’s take a minute to review this element. The first option shown sets the channel. We allow a variable or a static channel, in this case, we want to post back to where the member joined the channel so a variable is used. The message body merges in our Campaign welcome message, but static text can be incorporated as well.
Next we, have some optional details such as posting the record details (we don’t want that in this case, but this can be very useful to provide users context of Salesforce in the message). The Link to Channel option will allow the conversation to be tracked in Salesforce using the Centro Lightning Web Component. Attach Salesforce File attaches a file or Report to the message. Send Ephemeral message is enabled here because we want the welcome message to show up only to the joining user no,t to all channel members.
Custom buttons can be attached to the message. Notice that they have a defined Centro API name whithatn be handled by our Platform event handler. Button behavior can be defined as well, such as triggering a Slack Workflow Webhook (for example pushing a Form to be filled out), or invoking a Platform Event to invoke another Flow. Notice that the Salesforce authentication can be required or not – in this case, since the users pressing the button don’t have a salesforce license, we will leave it unchecked.
For this example, we leveraged the powerful native functionality of Salesforce Flow, Slack Workflow Builder, plus the managed Centro elements and steps to build this clean customer experience in Slack. The Centro steps fired Slack Workflow from Salesforce, Salesforce Platform events from Slack, all tied with our easy-to-use interface elements!
Learn more about Centro at www.centro.rocks, or check out our AppExchange and Slack App Directory listing!
https://unofficialsf.com/wp-content/uploads/2022/09/largeUCSF-300x133.png00Alex Edelsteinhttps://unofficialsf.com/wp-content/uploads/2022/09/largeUCSF-300x133.pngAlex Edelstein2021-09-22 15:00:262021-09-22 15:00:31From Centro: Robust Automation in Salesforce and Slack using Flow, Platform Events & Workflow Builder
I was eager to test the new flow orchestrator and found a use case to try. When a user submits a case to be provisioned as a partner user, we need to process two manager approvals and then provision the contact and the user under the partner account. I built an orchestration to complete the approvals and then provision the user
I used the tutorials provided here by Alex to build this. The overall design uses three flows that share data using input and output variables.
My starting conditions were based on case creation
The manager approval is routed to the approving manager lookup field from the case
The supervisor approval is routed to a specified username
My approval flow is very simple and includes just one screen. It outputs the approval, and some user data from the case, that will be consumed by the provisioning flow. I used some interesting formulas to parse the supplied Web Name from the case to a first name and a last name, and since only variables can be designated for output, I’m assigning my formulas as the default value of the output variable
Here is how the approval request screen looks to the approving manager
Next, I created an autolaunched flow that evaluates both approvals and outputs the special “isOrchestrationConditionMet” boolean value that tells the next step to start. This flow also updated the final approval status on the case record.
Then my provisioning flow will start and show as a work item to the case owner
Here is how the provisioning screen looks to the user. The first name, last name, email, and account name, are populated from the approval flow and case record data.
In this screen I’m using the Quick Lookup flow screen component to dynamically filter the user role list based on the selected partner account
And after the provisioning is complete, the flow shows the success scree
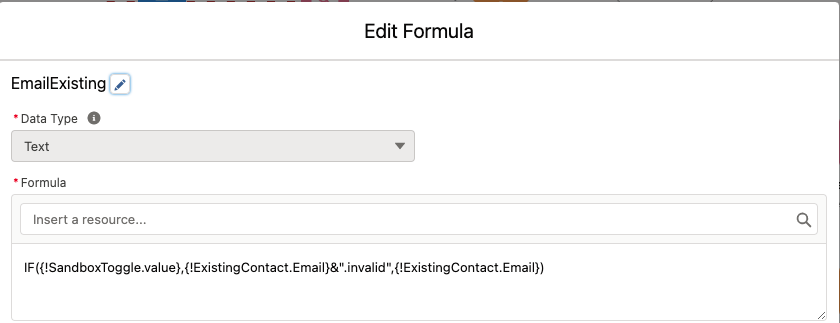
I used some special formulas to set the alias, email, nickname, and username for the new user. To avoid a mixed DML error, I used the Commit Transaction action between creating the contact and creating the user.
When the orchestration completed, I was able to view all the completed stages, and steps in the flow orchestration instance history
Overall, building this orchestration was fun and easy. I can see how powerful this tool can be for handling complex processes. I would like to be able send an approval request to non Salesforce users, that can approve by replying to the email, or by going to the work item component publicly exposed on a community page. I’m looking forward to seeing how this tool will evolve and to all the enhancements that will be made.
https://unofficialsf.com/wp-content/uploads/2022/09/largeUCSF-300x133.png00Tamar Erlichhttps://unofficialsf.com/wp-content/uploads/2022/09/largeUCSF-300x133.pngTamar Erlich2021-09-17 14:07:042021-09-18 07:11:57Flow Orchestration Use Case – approve user provisioning
At my current organization, we built and maintain an Experience Cloud Site where Employers engage with Candidates about open opportunities and internships along with a large networking event held in the fall. Employers will post their job/internship opportunities on the site and candidates can one-click apply to these specific roles. As candidates build their profile and update their profile they have an option to receive a notification either daily, weekly, or monthly about recently posted opportunities matching the timeframe selected. Sending these notifications used to be sent a long time ago by someone literally copying and pasting a list into an email and sending them out. Enter Generate Collection Report, Extract String from Collection, Send Better Email, and Scheduled flows. Now this is an automated process.
Step 1 in the flow was setting the criteria for the schedule in this case I am not doing this for a specific record but using 2 collections so I just set the frequency and start time and not object in my start element.
Step 2 get all of the Job & Internship Postings that have been created within the last 24 hours and are published. I have a formula for today that is {!$Flow.CurrentDate}-1
Step 3 decide if there were any postings to send all we are doing here is looking to see if our Get Job & Internship Postings returned any records.
Step 5 create the Collection Report using Generate Collection Report. This apex action allows you to input a record collection and return specified fields into an html formatted report/table. For full details on this component check out this post.
Step 6 get Experience Site Users to send the notification to. (note for new flow users see how I am using a label to match the ProfileId try and not to hard code ids in flow)
Step 7 update the Lightning Email Template that is used in the email send with the updated Job & Internship Postings. The only thing I am updating is the outputvalue from the Generate Collection Report action.
Step 8 get userIds from our user collection using Extract Strings from Collection Action which can be found as part of the Collection Processors package
Step 9 use Send Better Email to send a mass email with a template to the candidates
Finally, Sit back relax put on your superhero cape and sip on your drink of choice and enjoy your work.
https://unofficialsf.com/wp-content/uploads/2022/09/largeUCSF-300x133.png00Josh Daymenthttps://unofficialsf.com/wp-content/uploads/2022/09/largeUCSF-300x133.pngJosh Dayment2021-09-15 11:24:212021-09-17 11:38:24How I Built This: Use Generate Collection Report, Extract Strings from Collection and Send Better Email to Keep Users/Clients Up to Date
This blog post covers a range of topics interesting to Apex developers evaluating Flow’s strengths and weaknesses, including test automation and map support:
Support for Process Builder Processes that Launch Flows
The latest update of Convert To Flow adds support for Process Builder processes that launch flows, converting them to Triggered Flows that use a Subflow.
NOTE: this requires a Winter ’22 Org.
The Newly Generated Flow Will Use Before-Save Triggers If Possible
If the source process or rule does a straightforward field update, a high-performance Before-Save trigger will be used. If the source process does something that’s not allowed Before the Save, an After-Save trigger will be used.
Bug Fixes
Several bugs have been fixed that were preventing successful conversion.
https://unofficialsf.com/wp-content/uploads/2022/09/largeUCSF-300x133.png00Alex Edelsteinhttps://unofficialsf.com/wp-content/uploads/2022/09/largeUCSF-300x133.pngAlex Edelstein2021-09-10 06:41:272021-09-10 06:41:34Convert To Flow Now Generates Before-Save Triggers and Subflows
The ConvertCSVToRecords action has been upgraded to add the following features:
Support for Non-US Separators
Contributor Hijlko added this useful improvement. With it, you can import CSV files containing values that use non-comma separators like semicolons. Standard US csv uses a comma as a field separator while most European csv’s use a semicolon as a field seperator.The code can now import muli region CSV files Numbers/currency like 1,2345.56 (US) and 1.234,56 (EU) are converted to 1234.56
You can now set the following:
Field Separator
Thousand Separator
Decimal Separator
Currency Symbol
If these inputs are left empty, the existing default values will be used.
Support for Non-US Dates
Date values in the formats YYYY-MM-DD and DD-MM-YYYY (or with non-hyphen separators like YYYY/MM/DD and DD/MM/YYYY) are now automatically converted to YYYY-MM-DD, which is the Salesforce standard.
Additional Robustness in Handling Non-Alphabetical Characters
Contributor Suraj Pilai has improved this action so that CSV’s with the following characteristics will now be properly processed:
Rows/File beginning and ending with quotes
Newline characters within columns
Null columns at the end of a row
Supports the CSV spec definition of double quotes, which is represented by consecutive double quotes ("") within a column enclosed in double quotes:
Option to Trim Leading and Trailing Spaces
Set isTrim to true to have any leading or trailing spaces removed.