Flow Development Community ‘Flowcast’ – June 2021
Check out the Flowhana’s contributions for the month of June in the latest Flowcast video!

Check out the Flowhana’s contributions for the month of June in the latest Flowcast video!
Flow Orchestrator takes a wide range of rich, sophisticated, and complex business process use cases that require code today and makes them easy to create with clicks. It makes it possible to automate multi user processes so I try to verify if Flow Orchestrator replaces the standard approval process.
A SaaS company provides various products with their customers. They give free trials for their products to their prospects and manage this process using a custom object called “Free Trial”, which contains Start Date of trial, End Date, Products, and related Opportunity.
The Sales VP would like all Free Trial requests to be routed controlled by an Approval Route table which is a custom object and it to be routed with serial and parallel mode.
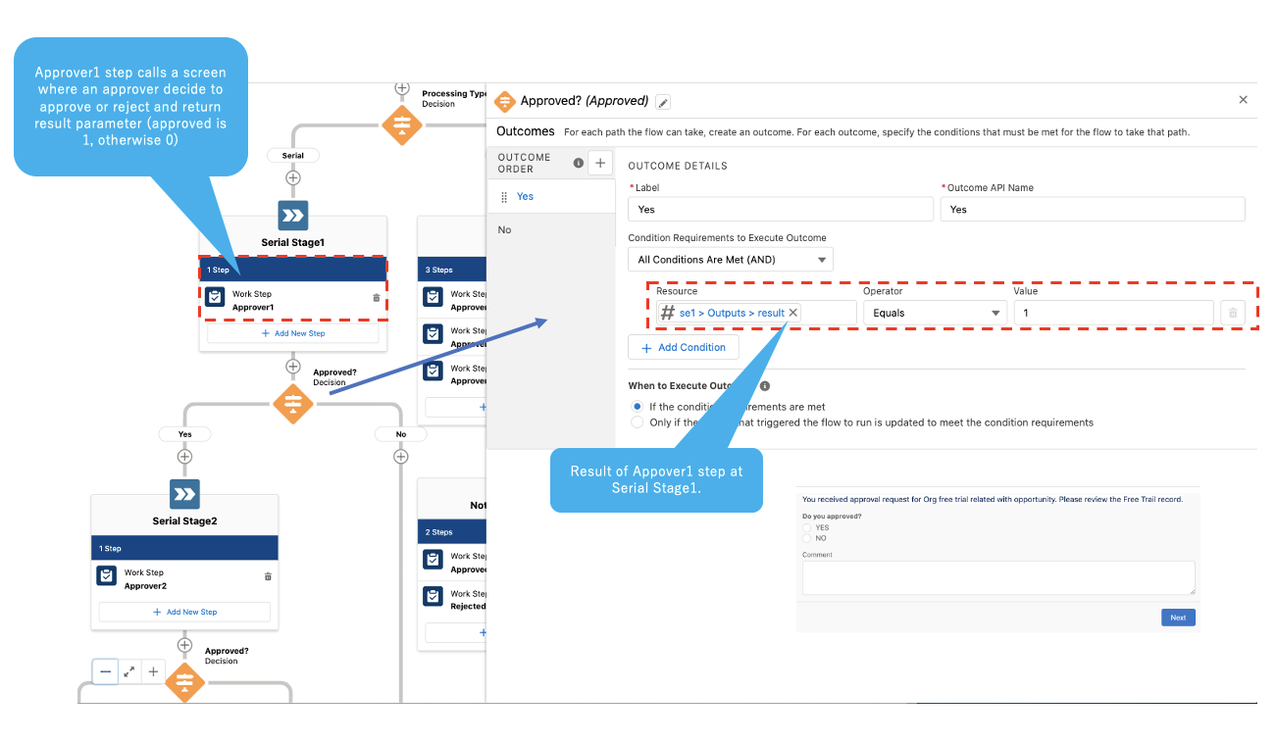
This is a screen flow where an approver decide to approve or reject and return result parameter (approved is 1 otherwise 0)

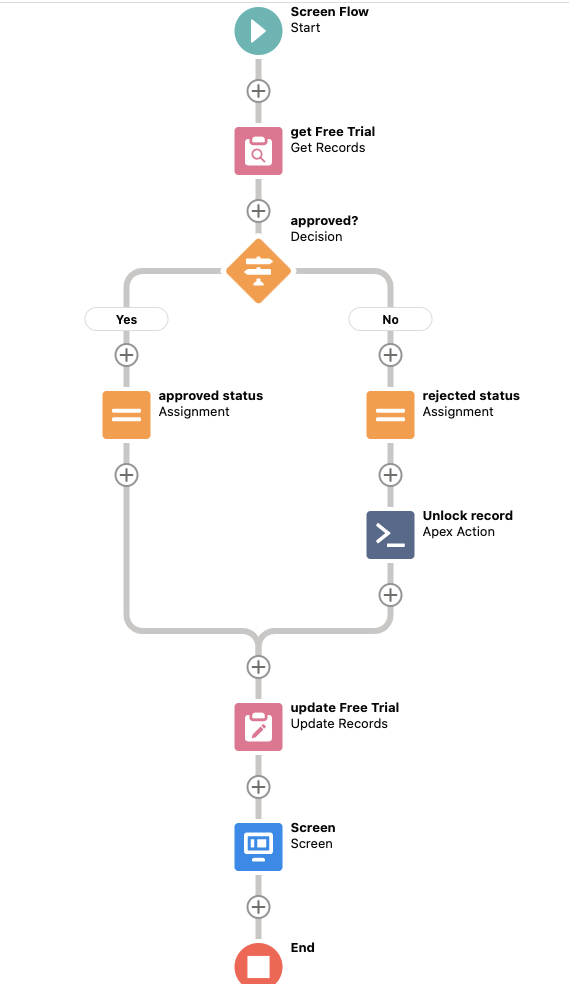
This screen flow receives is_approved (boolean) and recordId (string) as input parameters and update a Free Trial record’ status based on is_approved value. In case it is rejected, Apex action for unlocking the record is executed. Finally it shows whether the approval process is accepted or rejected to a requester. This implementation looks weird to you because the status of the record is updated after the requester executes this screen flow. Yes, it does. The current Flow orchestrator supports only screen flow. We can not hook up an event where three approvers complete their decisions for parallel mode (send approval request to approvers simultaneously) Do not worry about it. Flow orchestrator will support Autolaunched Flow soon. Once it comes true, we can get rid of updating and unlock record logics from this screen flow.
Custom action of Free Trial record calls this screen flow. After requester completes to submit for approval process, Submit_Approval__c of the target Free Trial record is set to true. This triggers AI Approval Process Orchestration.

One of my favorite features of Flow orchestrator is that we can customize how a step or a stage will be triggered or considered complete. We can invoke an evaluation flow to evaluate the entry condition of a stage or step. This flow is an evaluation flow for parallel mode. An evaluation flow must be Autolaunched Flow and returns isOrchestrationConditionMet parameter (boolean). Since autolaunched flow can query objects and make API calls via Apex , execute logic, and so on, you can make complicated decision logic.
The flow receives parallel decision mode (Majority wins or CER overrides), role names for three approvers, three approver’s decisions, and “from approved stage” ( boolean value, from approved stage or rejected stage) as input parameters and returns isOrchestrationConditionMet boolean value. The current Flow orchestrator does not support evaluation flow within the Decision element so I need “from approved stage” input parameter so that only proper step is triggered. I will jot about this at AI Approval Process Orchestration section below.

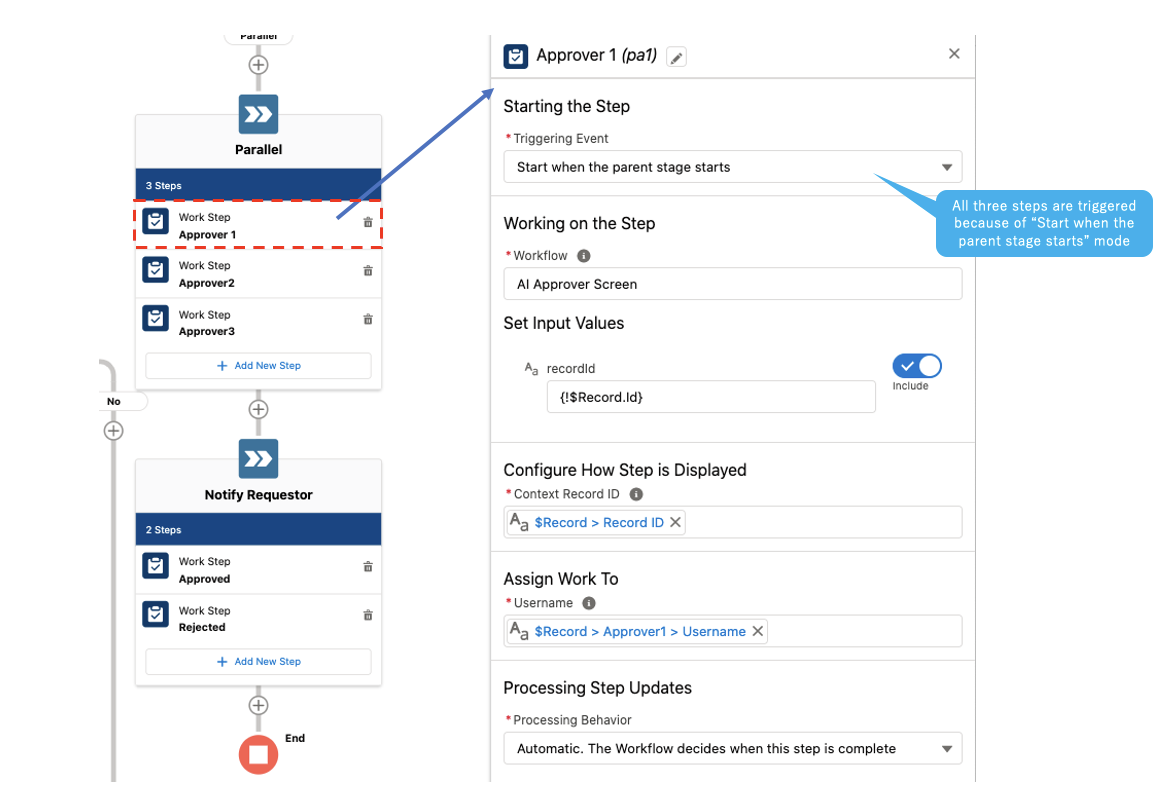
It is Record-Triggered Orchestration where object is Free Trial and condition is Submit_Approval__c Equals true. It orchestrates AI Parallel Approval Decision Flow, AI Submit Approval Process Action, AI Requester Screen, and AI Approver Screen.
Serial mode
Parallel mode
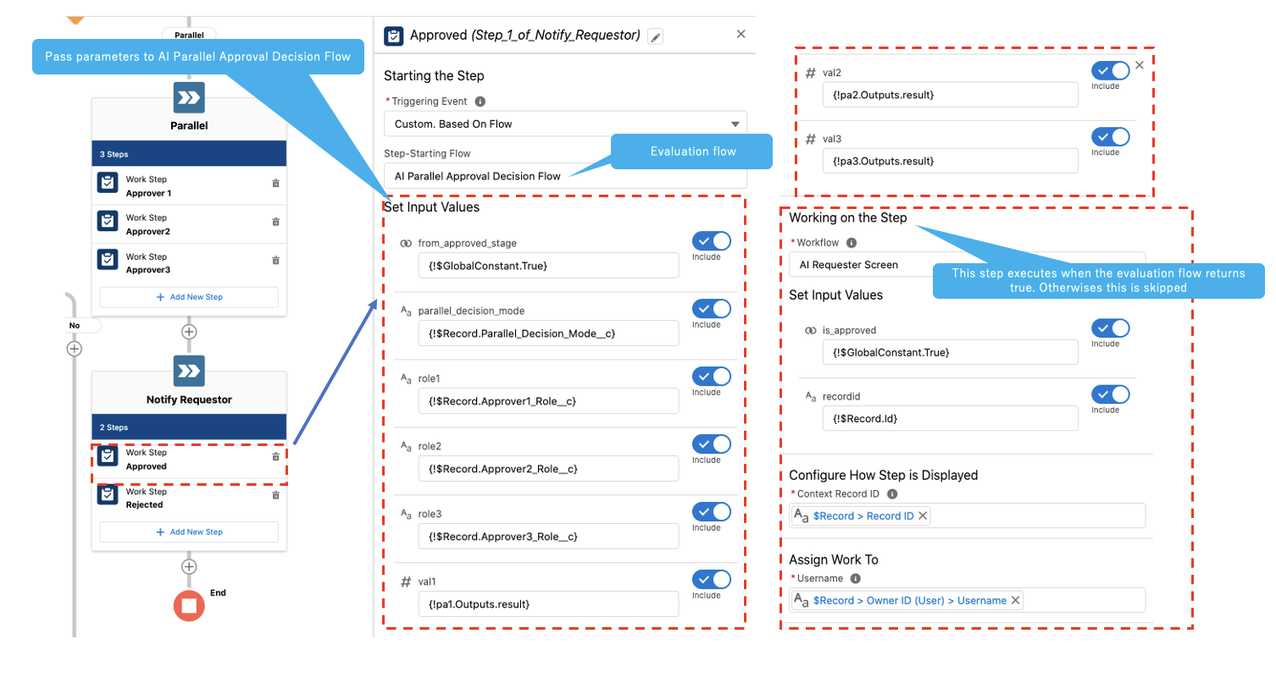
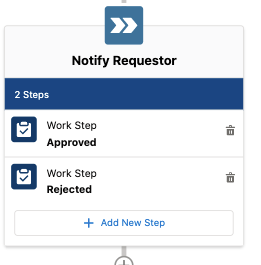
As I mentioned necessity of “from approved stage” input parameter at AI Parallel Approval Decision Flow section. I want to execute either a Work step named “Approved” or “Reject”. For instance, AI Parallel Approval Decision Flow returns true at Work step named Approved and do false at Work step named Rejected under approved Free Trial record.
I have confidence in replacing the approval process with Flow Orchestrator because I believe that new functionalities related to the approval process will be available at GA. My implementation of the approval process is a little bit complicated because of lacking standard functions such as supporting Autolaunched Flow, recall approval process (back to previous stage), standard actions (lock & unlock record, get queue member) but I am very excited to continue to watch new features.
Requester
Approver
# The custom notification is not implemented for serial mode and you need to refresh a Free Trial detail page to change status after requester confirms at Work Guide
Since the uninstall package contains flow orchestrator, you need to delete some components manually first.
Please check https://youtu.be/mwIVAZb9pVA at youtube for uninstall the package
If you’re reading this at some point in the future, then hopefully this will all be a distant memory, but right now, Flows and the Time field type really don’t get along. Which is a shame, because we love Flows and we need to work with data in time fields.
We have found a way. We also built a declarative time picker in Flow and the Summer ’21 release has made it better. So, if anyone else is struggling like I was, this is what we did …

Before we get to the time picker, you first need to get Time into your Flow. Unless I’m missing something fundamental, that’s not as easy as you might think.
We need to do four things …
Sounds simple right? Except we tripped over at number one. These are the obvious things we tried that you can’t do …
But, that last one’s not so very far off what we did get to work. Essentially build formula fields on the Object that return the HOUR and MINUTE values of the time field as integers. That’s not very efficient, but it does work and you can read the hour and minute values and then have a Time value in your Flow to play around with.
So now we have that, we can make and populate our time picker.
You can probably work out from the picture exactly what you need to do, but here’s a little summary …
And then this is where Summer ‘21 gives us another helping hand, because you can now set the default value of the picklist to the hour or minute value. That in turn means you can pre-populate the value of the time picker with the value of a record you want to Clone or Edit.

Superb. Now all we need to do is save it and we’re done.
Ha!
Because Flows aren’t particularly good at saving into Time fields either. You can’t just convert the Hour and Minute values into a TIMEVALUE because there’s no such function available in a Flow. However, after a bit of rummaging around I discovered that you can save a DATETIMEVALUE into a Time field and the date gets stripped out just leaving you with the time and there is a function available for that.
So, you make a little formula to do that. Here’s mine. You can choose any date you like.
| DATETIMEVALUE ( ‘2020-01-01 ‘ & IF ({!StartHourInput}<10,’0′,”) & TEXT ({!StartHourInput}) & ‘:’ & IF ({!StartMinuteInput}=0,’0′,”) & TEXT ({!StartMinuteInput}) & ‘:00.000Z’ ) |
And then you can save that using a Create Record Element. One final ‘gotcha’ is that this only works if you try to save the record directly and it doesn’t work if you try to assign the value to a record variable in an assignment step. So, you can’t add records to a collection and save them all at once. Instead you have to go against best practice and start Creating or Updating records inside a loop, which is far from perfect but it does work.
And that’s it – a declarative time picker for Flows 😊
This new Datatable release includes two new features and a few minor bug fixes.
Because the outputEditedRows attribute is not Null even if no rows were edited nor included in the output collection variable, I’ve added a new output attribute numberOfRowsEdited that can be used to check if any rows were edited. I’ve also updated the component to take advantage of the new Automatic Output Variables feature so outputs from one Datatable can now be specified as inputs to another Datatable in the same Flow without have to manually assign the first Datatable’s outputs to a variable.

Updates:
Bug Fixes:
Documentation Updates:
The Troubleshooting & Restrictions section of the documentation page has been updated as well.

Amit Singh from the blog SFDCPanther.com has written a post explaining how to create a LWC that will enable a Rich Text Area component in flow screens
Check it out
This new version of the converter (the original is here) has been updated to convert more kinds of Process Builder workflows to Flows, leveraging features added to Flow in the last 2 releases. It also now converts Workflow Rules.

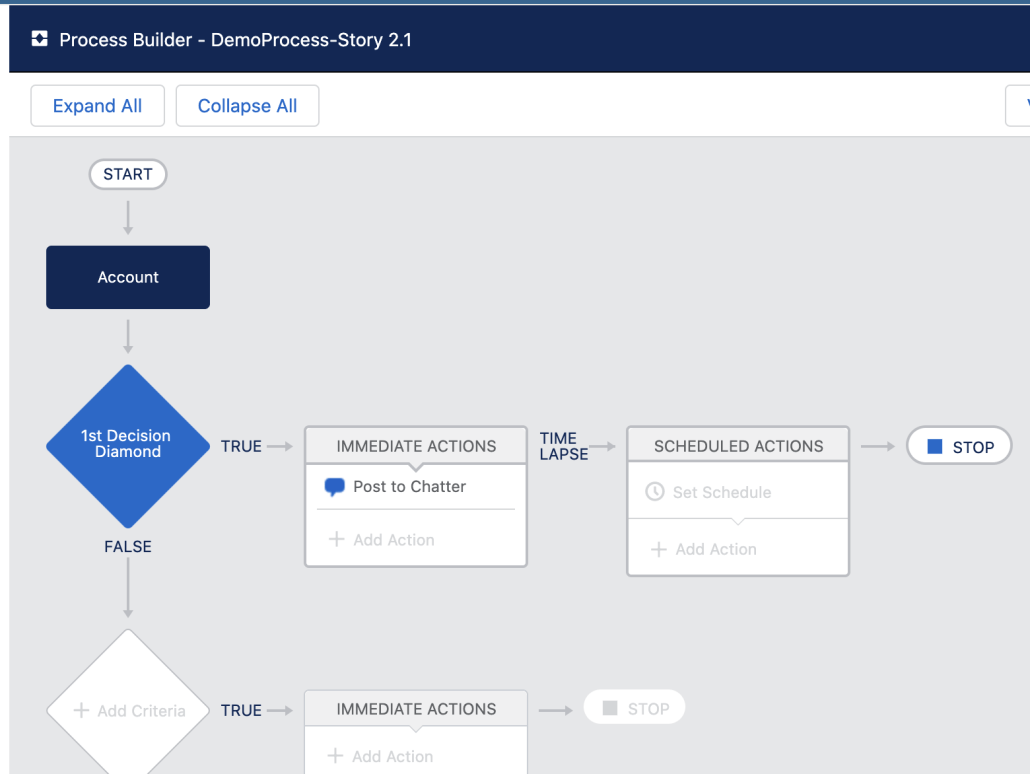
Let’s take a look at what a conversion looks like. Here’s a simple PB process:
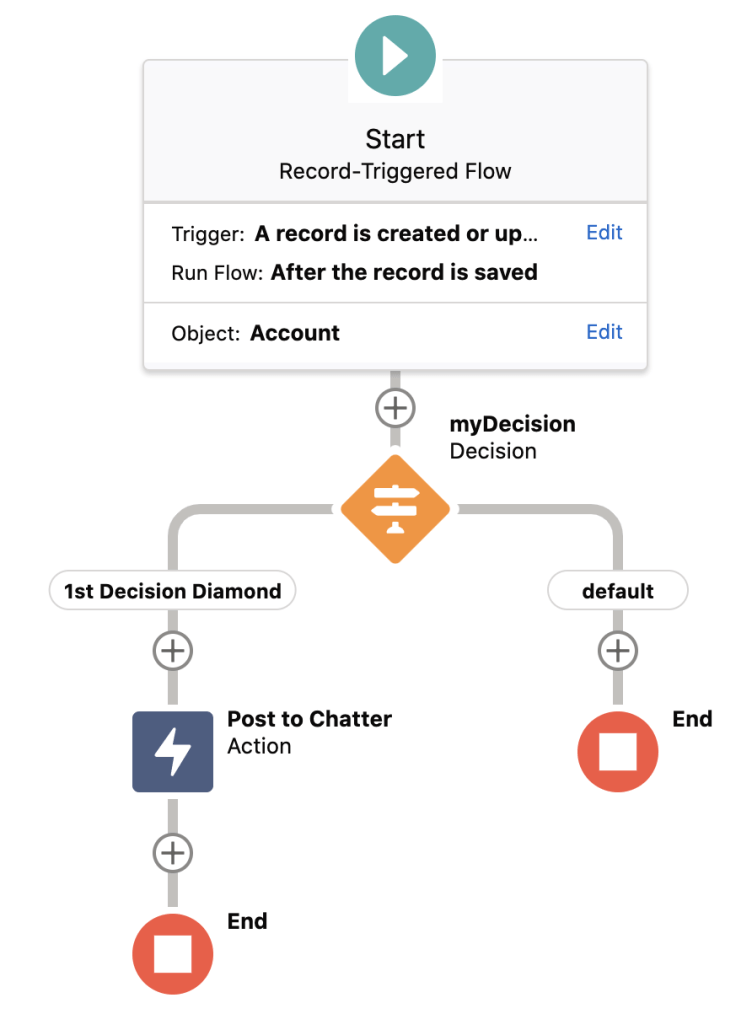
Here’s what the converted version looks like:
Let’s look at some of the improvements on the Process Builder side. Since the original version was released, Flow has added a bunch of matching features.

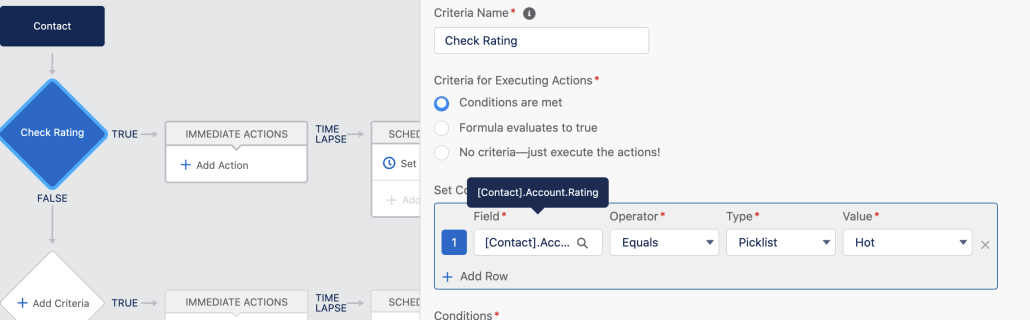
The setting of the checkbox is represented in Flow Builder here:

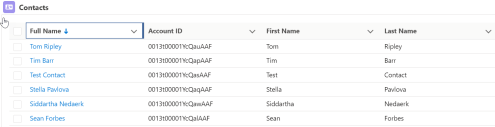
Here’s an example of a process that has a reference to a related record:
Here’s the converted version:

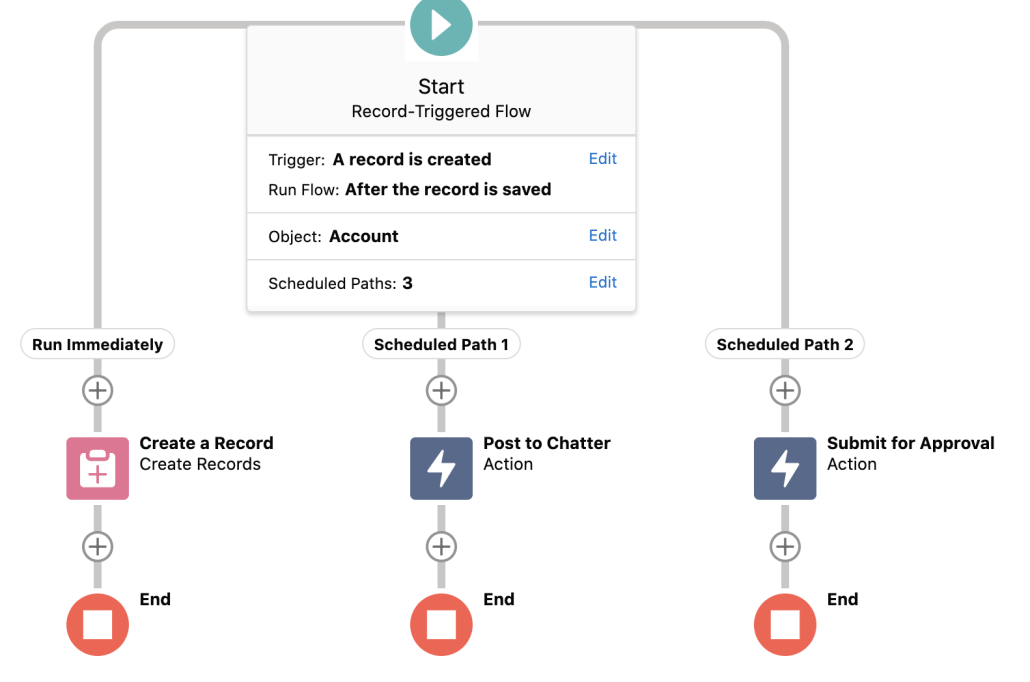
If the process has no more than 1 scheduled action per decision ‘row’, ConvertToFlow can convert it. Here’s an example of a process with 2 scheduled paths:

Here’s what it looks like after conversion:
This update to ConvertToFlow adds the ability to create Flows from Workflow Rules. Most WFR are supported, although Flow doesn’t support Outbound Messages yet and is not expected to support Recursion. Here’s a video showing some conversions:
The latest update of Convert To Flow adds support for Process Builder processes that launch flows, converting them to Triggered Flows that use a Subflow.
NOTE: this requires a Winter ’22 Org.

If the source process or rule does a straightforward field update, a high-performance Before-Save trigger will be used. If the source process does something that’s not allowed Before the Save, an After-Save trigger will be used.
Some Flows generated from Processes and Workflow Rules may behave slightly differently because of differences in the save order. See “Save-Order Considerations”, below. Currently ConvertToFlow always creates After-Save Triggers. Note the different points in the save order used by Process Builder, Workflow Rules, and After-Save Triggers in the list below.
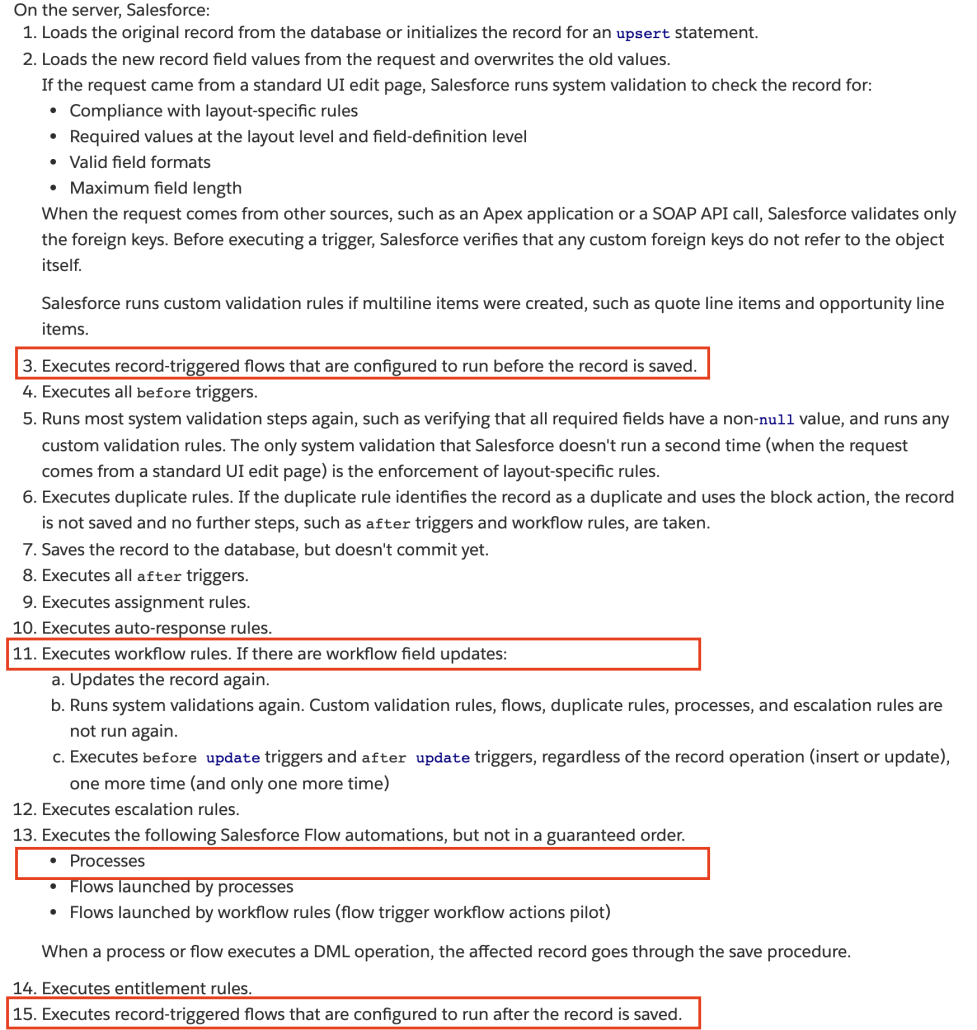
As can be seen, the sensitive functionality is Escalation Rules and Entitlement Rules. Entitlement Rules execute after Process Builder and Workflow Rules but before Record-Triggered Flows that execute After Save. Escalation Rules execute after Workflow Rules but before Record-Triggerd Flows that execute After Save.
ConvertToFlow does not:
Remote Site Settings issues
If you see this kind of error:
This page has an error. You might just need to refresh it. [LWC component’s @wire target property or method threw an error during value provisioning. Original error: [error returning from _getWFRDataApexIO Exception: Unauthorized endpoint, please check Setup->Security->Remote site settings. endpoint = https://saas-force-2107-dev-ed–c.visualforce.com/services/Soap/m/42.0%5D%5D Failing descriptor: {markup://c:flowPickerFSC}
Just as it says, you need to create a Remote Site Setting that points to your own org. In the example above, you would go to Remote Site Settings in Setup and create this:

Deployment Never Completes Issue
If retrieval works, but deployment of the converted flow seems to hang, it may be because of this: Your Apex Tests are all run when the metadata deploys even though Convert To Flow is deploying just a single piece of Flow metadata and no code. We recently changed Deploy to do this because with the previous setting that bypassed test runs, you couldn’t do Convert To Flow on production orgs (which don’t allow test runs to be bypassed for this situation).
What makes this confusing is that the test failure error isn’t getting delivered to Convert To Flow.
To see if this problem is caused by test failures, you can check your deployment status, which might look like this:

In this case, an unrelated class called DataManager, which is already installed on the org, has some broken test classes that are preventing Convert To Flow from successfully deploying.
You can also verify whether or not you have a broken Apex Class by clicking the Compile all classes link found here:

If you have _any_ compile failures, you will get this Deployment Never Completes error.
To get past this, you either need to fix the test class code or delete the class in question.
https://login.salesforce.com/packaging/installPackage.apexp?p0=04t5G000003rUwnQAE
This component requires that you first install or upgrade the Flow Base Packs
Install (Production) V3.0.2. 6-8-21
Install (Sandbox) V3.0.2.0 6-8-22
Old Versions
Install (Production) V1.2.3 9-22-21
Install (Sandbox) V1.2.3 9-22-21
Install V1.2.2 9-19-21 removed a demo flow that was calling
Install V1.2 9-10-21 Added Before-Save and Subflow Support IMPORTANT: this version requires a Winter ’22 org to successfully convert Process Builder Processes that themselves launch flows.
Install ConvertToFlow V1.1.0.0 7-14 Added WFR Conversion.
V 1.0.4.0 Unlocked 6/23 First package
The Custom Property Editor Developer’s Guide has been updated to include material about the new @api automaticOutputVariables attribute. If you use FlowComboBox in your CPE, you should create this attribute and then make sure to pass the resulting data to FlowComboBox along with the builderContext data. This will cause your embedded ComboBoxes to provide access to all upstream merge fields.

Here are some minor changes that were not documented officially.
The Number and Currency components were upgraded to new LWC technology. This results in the following new behavior:
123456789; SA – ١٢٣٤٥٦٧٨٩Are you looking for a taste of what you can find on here on Unofficialsf.com? How about some ideas on how to put some of the more popular Flow Components found on this site to work for you? Are you looking to improve how your users interact with your Lightning Record Pages?
Find all that and a few other ideas from a presentation I’ve given at Dreamforce and various other Salesforce events around the world. This recording is from the London’s Calling event held earlier this Spring.

I have either created or enhanced most of these components and they are all available, with source code, for free here on unofficialsf.com. They range from simple to complex, but all of them can be used in ways you may not have thought of before to bring out the best in your user experiences. The components are designed to be generic. No coding is required, and all can be customized and configured with built in parameters.
Check out my newest post on the #AwesomeAdmin Success Blog highlighting even more Flow best practices and standards. It even includes a handy checklist at the end for you to run through after making a Flow: https://admin.salesforce.com/blog/2021/the-ultimate-guide-to-flow-best-practices-and-standards
