New Flow Tutorial Videos from Salesforce Break
Check out this new set of video tutorials from Andy Utkan at ‘Salesforce Break’:

Here’s where you can find him on Trailblazer Communities.

Check out this new set of video tutorials from Andy Utkan at ‘Salesforce Break’:
Here’s where you can find him on Trailblazer Communities.
Created by Eric Smith – February 2021
This Post was most recently updated on: 2/17/21
The fsc_flowCheckbox component is designed to be used in a Custom Property Editor.
There is an undesired behavior when using a standard lightning-input with a type of checkbox in a Custom Property Editor. If a checkbox is checked in the CPE and then it is later cleared, its cleared value is not retained when exiting the CPE. An unchecked value will only be retained in the component if the user unchecks, rechecks, and then unchecks again before exiting the CPE.
This component allows the developer to display a Checkbox in a Custom Property Editor. It avoids the issues with a CPE checkbox not being persistent unless it is unselected more than once. It also supports the ability to give a boolean attribute a default value of True.
This component requires the addition of an extra string attribute to be paired with each boolean attribute that will be presented in the CPE as a checkbox. For example, if you have a checkbox (boolean) attribute called myCheckbox, you will need to add an additional attribute called cb_myCheckbox.
In your Flow Screen LWC, you will need to update both your component.js and component.js-meta.xml files to reference the additional attribute(s).
component.js
...
@api
get myCheckbox() {
    return (this.cb_required == 'CB_TRUE') ? true : false;
}
@api cb_myCheckbox;
...
component.js-meta.xml
<targetConfig targets="lightning__FlowScreen" configurationEditor="c-component-c-p-e" category="Input">
    ...
    <property name="myCheckbox" type="Boolean" role="inputOnly"/>
    <property name="cb_myCheckbox" type="String" role="inputOnly"/>
    ...
</targetConfig>
In your Custom Property Editor, you will need to update your inputValues section to include the additional attribute(s).
componentCPE.js
@track inputValues= {
    ...
    myCheckbox: {value: null, valueDataType: null, isCollection: false, label: 'My Attribute Label'},
    cb_myCheckbox: {value: null, valueDataType: null, isCollection: false, label: ''},
    ...
}
To use the checkbox component in your CPE, embed the fsc_flowCheckbox in your CPE’s HTML.
componentCPE.html
    <c-fsc_flow-checkbox
        name="select_myCheckbox"
        label={inputValues.myCheckbox.label}
        field-level-help={inputValues.myCheckbox.helpText}
        checked={inputValues.cb_myCheckbox.value}
        oncheckboxchanged={handleCheckboxChange}
    ></c-fsc_flow-checkbox>
You will also need to add this handler to your CPE’s JavaScript file.
componentCPE.js
handleCheckboxChange(event) {
    if (event.target && event.detail) {
        let changedAttribute = event.target.name.replace(defaults.inputAttributePrefix, '');
        this.dispatchFlowValueChangeEvent(changedAttribute, event.detail.newValue, event.detail.newValueDataType);
        this.dispatchFlowValueChangeEvent('cb_'+changedAttribute, event.detail.newStringValue, 'String');
    }
}If you want your checkbox to default to checked, you will need to make the following modifications to the steps outlined above.
component.js
...
@api
get myCheckbox() {
    return (this.cb_myCheckbox == 'CB_TRUE') ? true : false;
}
@api cb_myCheckbox = 'CB_TRUE';
...
componentCPE.js
@track inputValues= {
    ...
    myCheckbox: {value: null, valueDataType: null, isCollection: false, label: 'My Attribute Label'},
    cb_myCheckbox: {value: 'CB_TRUE', valueDataType: null, isCollection: false, label: ''},
    ...
}Sometimes, in your CPE, you will want to set or change the value of a checkbox attribute. Include this function in your CPE to handle setting the attribute value.
componentCPE.js
this.updateCheckboxValue('myCheckbox', false);updateCheckboxValue(name, value) {
this.inputValues[name].value = value;
this.dispatchFlowValueChangeEvent(name, value, 'boolean');
this.inputValues['cb_'+name].value = (value) ? 'CB_TRUE' : 'CB_FALSE';
this.dispatchFlowValueChangeEvent('cb_'+name, this.inputValues['cb_'+name].value, 'String');
}label – Prompt to appear to the right of the checkbox
name – When following the standard template for a CPE, this will be “select_attributename”
checked – Pass in the value of input.values.cb_attributename
fieldLevelHelp – Help text for the checkbox attribute
disabled – Set to true to show the checkbox as disabled in the CPE
This component is part of the Flow Base Packs package libraries (FlowScreenComponentsBasePack Version 2.1.6 or greater).
The source code can be found as part of the Flow Screen Components Base Pack.
As of Spring ’21, there’s a new flow action that shows up if Surveys is enabled in your org, allowing you to use Flow to send your survey invitations:

This initial release only takes a single recipient user, so it isn’t optimal for mass sends. It’s great for things like reminder messages. Mass Sending via Flow is on the Survey team’s near-term roadmap.
Note the use of Custom Property Editors by the internal team to provide picklists, checkboxes and multi-column layout in the property editor here.
Mohith Shrivastava is one of our great developer evangelists at Salesforce with deep Flow know-how. He recently recorded a full hour of content on this topic as part of the weekly Developer Podcasts that Josh Birk is producing here.
A lot of of our tutorials are either aimed only at admins or out-of-date or both, so this fresh content is a great addition.

New 11-21: See this EmailToFlow service in action to solve an Approval Processes problem.
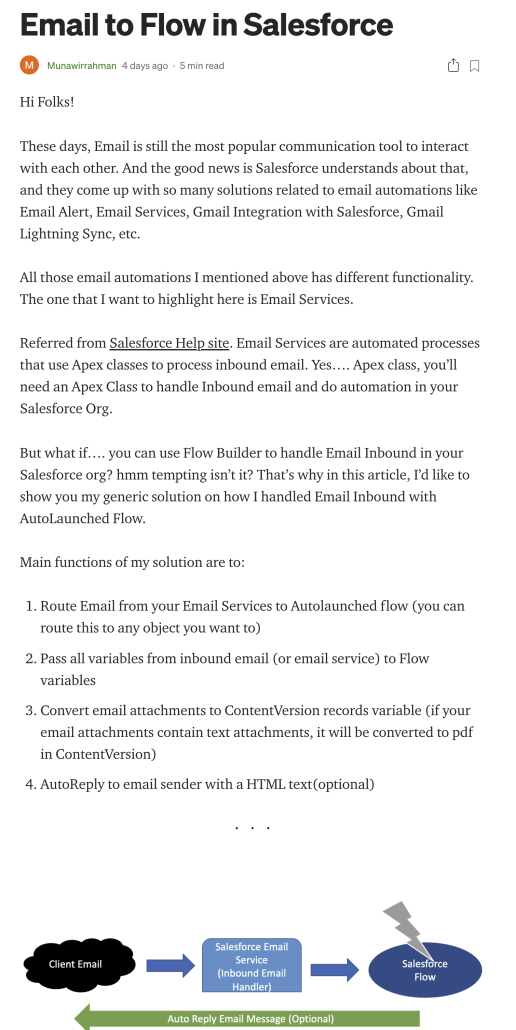
From Munawir ‘Mun’ Rahman in Indonesia comes a great package that installs an Inbound Email Service that takes incoming emails (each Inbound Email Service generates an email address that you can hand out), extracts the email into fields, and calls your flow. All you have to do is create a flow to handle the incoming emails with the appropriate input variables. He talks about it here, and you can install an UnofficialSF package of it below:
Version 1.0 Unlocked 2/11/21
Courtesy of Akihiro Aizawa at Salesforce, this chart shows the combinations where the Scheduled Paths button will appear in Flow Builder. Note that in Spring ’21, Scheduled Paths only appears in the original Freeform mode, and not in the beta Autolayout mode.

The very well executed Release Readiness Live video for Spring ’21 features deep-dive introductions to Prior Value resources in Flow, Scheduled Paths support, debugging enhancements, and more.

The Digital Engagement team in Service Cloud has added a useful new action for sending SMS messages. It’s called Messaging Notification. Here’s what it looks like in Flow Builder and in Process Builder:


Currently, the input parameters are labelled quite differently between the two versions.
Set Recipient Record ID to either 1) the ID of a MessagingEndUser (this is a special record created by the messaging infrastructure) or 2) the ID of any other object that has at least one phone number field.
You can query for a MessagingEndUser record. Query for records where 1) their MessagingPlatformKey matches the phone number on a specific field of the context record field, and 2) their MessagingChannel is the same as the one specified in Messaging Channel Unique Name.
If the Recipient Record ID is set to the Id of an object other than a MesagingEndUser:
If the Recipient Record ID is set to the ID of a MessagingEndUser:
Don’t specify a Recipient Phone Number because MEU’s have an associated specific phone number
Context Record Id is required. It is used for determining how to resolve merge fields. It’s based on the who/what context used by tasks and activities, so it needs to be something like a Contact or a Case.
ConversationBroadcast Record Id is optional, it’s used by the broadcast feature and just ties all the messages sent to that broadcast.
The field ‘Triggered Outbound Type’ is optional. Expected values are ‘Standard” and “Broadcast”. This is intended to work with the work.com broadcast feature.
This Post was most recently updated on: 11/2/23
Eric Smith – Added simplified example image
Do you hate food recipe blogs that go on and on about a special story about how they grew up smelling grandma’s cooking and getting frustrated because you just want to get the recipe? Your kids are crying, the garlic and onions are burning, and you finally get to the recipe but it’s covered by an ad on your phone and the browser crashes.
This is not that post. Let’s get right to it!
I recently wrapped up work on a nifty action called ‘FindCommonAndUncommonRecords’ that can compare two like/unlike record collections based on a unique identifier that you specify. It then can provide 4 outputs providing records unique and shared between the two collections based on the identifying fields you provide.
The thoughts and solutions in this post are my own and not that of Salesforce.
The action can take a bit of effort to wrap your head around so I created a scenario showing off a hypothetical model involving Accounts and two custom objects, Gas Stations and Gas Station Relationships. An Account can be related to many Gas Stations through the Gas Station Relationships custom object.

Let’s say you build a screen flow that lets the user associate whatever Gas Station they want to the Account (using Datatable or a Lookup component). You will be creating these Gas Station Relationship records to set up that relationship. The catch here is that there are already Gas Stations tied to the account, but you have no way of filtering those out of the datatable/Lookup easily.
The user picks 4 gas stations to associate to Blackbeards Grog Emporium:
We then run this new action to get the Gas Stations not tied to the Account, or in other words the records unique to the selected collection by the user.
Here are the Inputs:
Here’s the output:
targetUniqueCollection (Gas_Station__c) – The gas stations unique to the selected gas stations compared to the account’s related gas stations. Returned as Gas Station records.
targetCommonCollection (Gas_Station__c) – The gas stations shared between the account and the selected gas stations. Returned as Gas Station records.
sourceUniqueCollection (Gas_Station_Relationship__c) – The gas stations unique to the account compared to the selected gas stations. Returned as Gas Station Relationship records.
sourceCommonCollection (Gas_Station_Relationship__c) – The gas stations shared between the account and the selected gas stations. Returned as Gas Station Relationship records.
From here, you can safely loop over the ‘targetUniqueCollection’ (the unique records selected by the user) to build your junction records without dupes!
This image is a simplified example of two collections being input to the component with four collections being output by the component. The letters represent the value of the designated source or target fields.

Inputs
Outputs
This is part of Collection Actions package, version 1.23 and higher.
https://github.com/alexed1/LightningFlowComponents/blob/master/flow_action_components/CollectionProcessors/force-app/main/default/classes/FindCommonAndUniqueRecords.cls
https://github.com/alexed1/LightningFlowComponents/blob/master/flow_action_components/CollectionProcessors/force-app/main/default/classes/FindCommonAndUniqueRecordsTest.cls
Local Actions are a specialty part of Flow, useful in a specific set of scenarios. This post recapitulates how they work and how you can use them.
I can already do these things in Lightning code, so why should I use Flow Actions?
Flow Actions are intended primarily for non-developers. Things like notifications can be done without writing any code. If you have the skill to build a Flow Action, we encourage you to publish it and make it available for others to install!
Lightning components support CORS calls today as long as the target site is configured in CSP Trusted Sites. So if Flow is using Lightning component is there a use case or need to use Local Actions to make cross domain calls?
The benefit of using a local Flow Action for web service requests is mainly that you won’t have to write any code yourself.
Since External Services can handle authentication as well is there much need to use Local Actions?
External Services are powerful but have a few limitations. For one thing, they go through the Salesforce Cloud and require a firewall entry point to access a company’s on-premises servers. Local Flow Actions can be set up to make Direct Data Queries to on-premises servers. Also, External Services don’t provide access to Browser features like page creation and toast display.
However, the authentication used by External Services is handy. You can create a Named Credential and use it to get access to a web service. We anticipate that may Flow Actions will also use Named Credentials to establish OAuth connectivity to web services.
Why isn’t my local action working when I run my Flow from Flow Builder or a Custom Button?
Some local actions use events to cause things to happen in your browser. Show Toast and Flow Finishing