Building a Scheduled Alert Generator with Next Best Action and Flow

Suppose that you have an NBA recommendation strategy that runs on Account record pages, generating insights and recommendations specific to a given account. Your salespeople have 50 accounts, and they don’t want to have to manually visit every account page each day to see if there’s something new waiting for them there. What do you do?

Watch the Video

Overview

In this solution, we create a two part process. Every night a scheduled flow runs that kicks off a recommendation strategy for every active Account in the organization. This might take a long time and a lot of processing power, but we’re doing it in the middle of the night and can spread it out if we run into any load issues. When the flow gets the results back for a given account, it is only concerned with the _count_ of recommendations. If at least one recommendation has been returned, it marks that Account record by setting to True a boolean Account field called HasAvailableInsight__c. The recommendations themselves are discarded.

When the salesperson starts work the next morning, instead of visiting an Account page, they visit their Home page, where a different NBA strategy is running. This strategy generates a recommendation for each Account that has an available insight. This provides the user with an effective task list of accounts to check. They can click on a recommendation to take them directly to that account page, where the original Account strategy will present them with useful insights.

You can install the package provided here, which consists of the Scheduled Flow that runs at night, the two sample NBA strategies, and the action flow that navigates the user from the NBA component on the Home page to the appropriate Account page.

How It Works

Here’s the Scheduled Flow that runs each night:

This scheduled flow starts by loading the desired set of accounts. It loops over them, running the Execute NBA Strategy flow action against each account. (Note that this flow action is included in this package). This flow action has been enhanced to return a count of the number of recommendations, and this count is used in a decision element to determine whether the HasAvailableInsight__c field should be set to true or false. After the looping is complete, the updated accounts are saved.

Here’s the configuration of the flow action:

The Home page looks like this:

Here’s the strategy that runs on the Home Page:

The account records are mapped into recommendation objects with this configuration:

To navigate the user to the appropriate account page from the home page, the Navigate Everywhere flow action is used.

The final strategy that runs on the Account page can be anything you want, but you obviously want it running the same analysis that the nightly scheduled flow runs.

Install

Not yet available as a package.

View Source

Source

The New Flexcard Screen Component

Updated: 7/21/2022

In response to a call for volunteers, Josh Dayment and Karan Pant joined forces to create this great new component.

The Flow Flexcard Component presents collections of records in a neat set of actionable cards. You can populate each card with a set of actions that the user can take on the selected record. When clicked the actions pop up as flows in a modal. This provides a great combination of permanent viewability and Flow functional tools.

Here’s a great walkthrough video by Josh Dayment:

How It Works

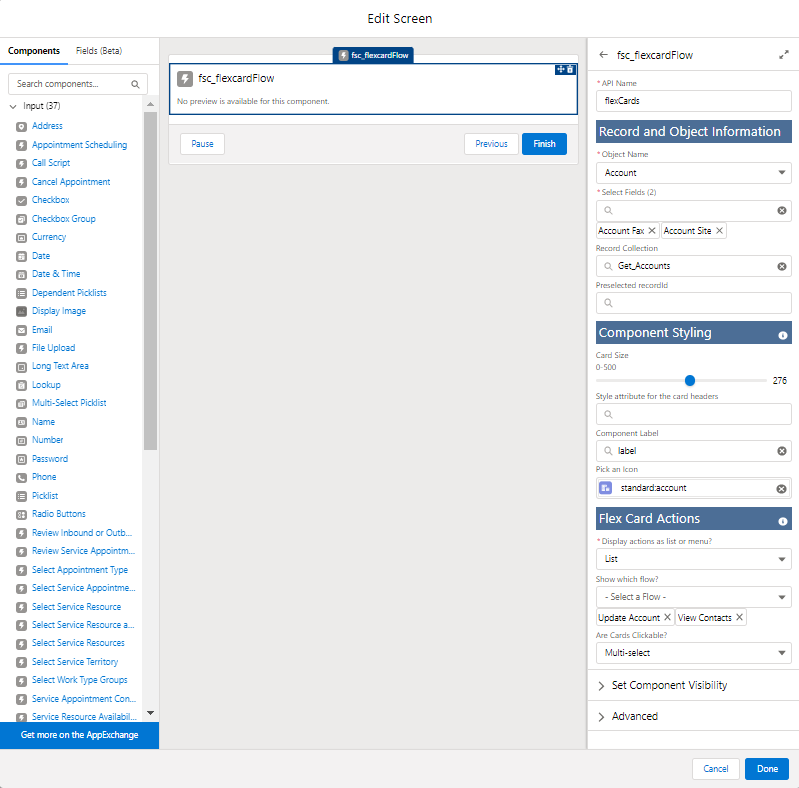
Letโ€™s take a look at an example flow. A Get Records returns a collection of accounts. In the custom property editor, you can see I’ve specified the specific fields I want to pass into the component, the size of my cards in px, my component label, icon, and Flex Card actions.

Working with Flexcard Actions to Allow Record Editing

In this example, you can click Update Account to edit an individual record:

When you do this, the corresponding Flow runs in a modal:

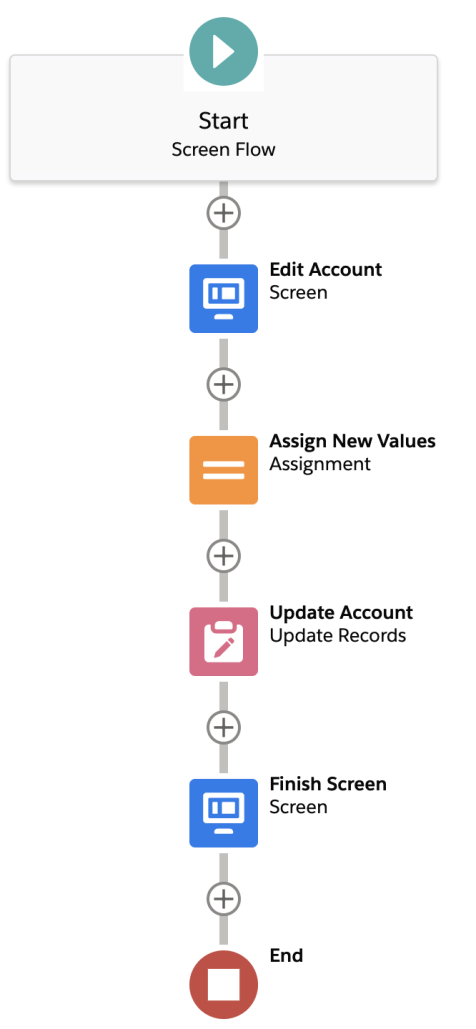
Note that it’s up to you to commit changes to the record. Here’s what Update Account looks like:

Inputs

The component has a few input variables we need to display the cards.  

  1. Object Name, this is the Object API Name of the records you want to display. 
  2. Select Fields, This utilizes the Object and Field Picker this will display a list of the available fields from the object selected in Object Name this can be one or multiple fields selected.
  3. Record Collection, A record collection variable containing the records you wish to display in you cards. 
  4. Preselected RecordId, This is the recordId of a preselected record if you choose.
  5. Card Size, This sets the size of your cards the default is 300 this will set the size to 300px by 300px. So for example if you want to make them a little larger set the number to 500 
  6. Header Style. String variable to hold standard HTML style tags to control appearance of card headers.
  7. Component Label, This adds a label to your component it supports a string variable or text template to include rich text.
  8. Icon, If you wish to display an Fallback Icon on your card header enter it here I.e. standard:account(You can also display a custom image by housing an image url on a url field on each record that field name must use the api name of src_URL__c) 
  9. Display Actions as List or Menu? This decides how you actions are displayed in the card. List, This displays the subflow labels as hyperlinked urls. Menu, This will display a Menu button with each subflow as a menu item. If Menu is selected you are displayed another input to capture the Menu Label.
  10. Show which flows?, This utilized the Flow Picker component you can pick one or multiple subflows from your org. The subflows must have an input variable of recordId if you want to pass the recordId from the card into your subflow. The flow labels will display in your card so be cautious of what you label your flows.
  11. Are Cards Clickable? Single Select, you can select a single card by clicking on it, and the id of the selected card will be made available as an output, Multi-Select If set to true, allows for selection of multiple cards and stores recorded of selected cards into collection variable of selectedRecords. Single-select and autonavigate, when you select a card it will store the id of the selected card as an output and will cause and immediate transition to the next screen.

Outputs

This component utilized 2 main outputs

  1. Value, This is utilized in either of the Single Select modes it will store the recordId of the selected card in this variable
  2. Selected RecordIds, This is utilized in multi-select this stores all of the selected cards recordIds into a text collection variable.

Developer Note

“The card header and fields displayed in the card process data differently. The header is referencing field data from the get records portion of the flow itself where the data on the fields in the fields displayed is using lightning-record-view-form to populate the field values so it is actually getting those values oob vs the flow getting the fields and values. So, for example, I can get All Accounts and select the fields I get to only ‘Name’ and if I select to display multiple fields it will still display all of the fields and values I selected in the CPE. From the component library “lightning-record-view-form requires a record ID to display the fields on the record. It doesn’t require additional Apex controllers or Lightning Data Service to display record data. This component also takes care of field-level security and sharing for you, so users see only the data they have access to.” So, in short, it is working kind of as designed the fields and field values are being processed outside of the flow in the card so we can’t override sharing but the name we are getting from within the flow. The short-term solution would be to have a session-based permission until I can solution and build a way to only show the cards when there is complete data.”

Install

Flexcard is available in Flow Screen Components Base Pack. Install it here.

View Source

Source

Preview: Assign Cases Using Skills with Omni-Channel Flows

The Service Cloud team has been working to deliver Flow Actions that route cases by tapping into agent skills. This functionality is available today in Service Cloud in a non-Flow way, but the new extension to Flow allows customers to customize this functionality to an unprecedented degree.

Check out this mammoth 3-part preview from leCharles:

Swarming with Flow: Create Deal Rooms in Slack for your Account Teams

Swarming refers to the assembly of a group of collaborators to team up to solve a problem or work an issue. The recently published Slack Actions can be combined with Record-Triggered flows to automatically generate dedicate Slack channels (think ‘deal rooms’ or ‘case rooms’) when records are created or change to a particular state.

The package provided below installs a fully functional flow-based Slack swarming solution that you can install and customize. As initially configured, it creates a channel to serve as deal room each time an opportunity is created with an amount above $100,000. And it then invites all of the Account Team Members for that opportunity’s related Account to the created channel.

Watch the Video

Key Element – Using Account Team Members in Flow

You can query for Account Team Members in Flow using the standard Get Records. Traditionally, you might loop over the records and use their corresponding userIds to retrieve User records. This flow uses a couple of installable flow action extensions to eliminate the need for a loop.

How It Works

Part 1: Triggering on Opportunity Creation

The Opportunity Creation trigger uses the Launch Flow Dynamically action to call the separate Generate Deal Room flow. Later this year it will become possible to do this all in a single flow instead of in 2 flows.

Part 2: The Main Deal Room Generation Flow

This flow uses Slack Actions from the Slack Actions extension and also calls a subflow to convert Account Team Members to Users:

Part 3 : Getting Users from Account Team Users

This small flow uses actions to turn Account Team Members into User Records. These elements could have been folded into the above Generate Deal Room flow, but it’s a good practice to try and create reusable subprocesses.

The solution

Installation

1) Turn ‘Account Teams’ On

The org this is installed into must have Account Teams activates (See Setup –> Account Teams)

2) Install Prerequisite Extensions

The org needs the following extension packages, if you don’t already have them installed. They should be installed in order:
Install: Flow Actions Base Pack
Install: Flow Screen Components Base Pack
Install: Datatable
Install: Launch Flows Dynamically
Install: Slack Actions
Install: Collection Actions

This is the most dependencies I’ve yet seen on a Flow extension! It’s a pain to have to do them all at once, but once one of these is installed, you don’t have to do it again unless you choose to update it to a newer version.

3) Setup Account Team Members

Currently, if you create an Opportunity and it doesn’t have an associated Account that has at least 1 Account Team Member, the flow will fail and the deal room will not be created. So make sure that you are creating an Opportunity that has an Account and that that Account has an Account Team with at least 1 member.

4) Make Sure that the Users have SlackIds

For each Account Team Member that you want to enable, make sure they have a SlackID on their User object. If necessary, create a text field on User called ‘SlackId’. Slack ID’s are available here:

You can also discern them by running Salesforce Slack Administrator flow in debug log and seeing what the result is in the log when you try inviting a user to a channel

Install

Working on making this available as a package.

Source

View source

Validation Checker Flow Action

Validation Checker Flow Action

Created by Eric Smith


This Post was most recently updated on:ย 6/12/22
Current Version: 1.6


Donโ€™t your users just love it when they see this on their screen?

The fun really starts when you get this email in your inbox.

You could certainly take the time and effort to add a bunch of decision elements and recreate all of your validation rules in your flow.  I bet it would be even more exciting trying to keep all of that maintained.  

Wouldnโ€™t it be nice if your Flows could check for and trap Validation Rule failures, missing required fields, lookup filter violations, text overruns and Duplicate Rule failures?

Well now they can with this simple Check Validation flow action.  

Before you attempt a Create Records or Update Records element in your Flow, add this simple Flow Action and pass it a single record or a collection of records.

This action will check your record(s) and let you know if there would be any Validation Rule errors, field size overruns, lookup filter violations, missing required fields and Duplicate Rule errors if you tried to create or update the record(s).

All this is done before you try to do something that would cause the Flow to fail with an unhandled fault.  You get to determine what to do next and what information you want to present to your user.


You can also use this action as part of your Fault Paths. Instead of just handling the fault without knowing exactly what it is, you can get the error(s) that caused the fault and act on them as you see fit.


In this Flow, a Toast Message will be displayed with any errors and the User will be given a choice of whether or not they want to Try Again or Exit.


You can specify which field from your record you want to include in the error messages to help identify which record(s) failed.

The action returns an isError boolean value along with a text message of the individual errors.  

Validation Rule Failures

Missing Required Field Error

Text Field Size Error

You can set an optional input attribute to have the Validation Checker review all Duplicate Rules when you are providing records to be inserted.

You can even specify an optional input attribute to use this action instead of the Create Records or Update Records to actually perform the inserts and updates if no errors are generated.  If you perform a successful insert of new records, the new record ID(s) will be returned by the action.

Take control of your automations and no more worrying about Flows crashing when User provided values wonโ€™t pass Validation Rules or other input errors.


Restrictions

  • If there are multiple types of errors, only one type of error will be returned.
  • If any Text fields are over their size limit, only those errors will be returned.
  • If any Validation Rule fails, all Validation Rule failures will be returned.
  • If any Required Fields are missing, only those errors will be returned.
  • If any Lookup field values violate the defined Filter, only those errors will be returned.
  • If specified in the attributes, Duplication Rules will be checked on new records.
  • Fields over their size limit are handled first, followed by Validation Rules, followed by Required Fields, followed by Filter violations, optionally followed by Duplicate Rule checks.

Attributes

AttributeTypeNotes
INPUT
Input RecordSObjectAny Standard or Custom SObject Record
Required: Provide either a Record or Record Collection, not both
Input Record CollectionSObject CollectionAny Standard or Custom SObject Record Collection
Required: Provide either a Record or Record Collection, not both
Record Identifier Field API NameString (Field API Name)The recordโ€™s value for this field will be included as part of the error message.
NOTE: The field must be included in the Record or Record Collection.
Optional, Default: Id
Check duplicate rules on new records?BooleanSet to True if you want the action to check Duplication Rules when adding new Records.
NOTE: This attribute will automatically reset to false if more than 150 new records are being inserted
Optional, Default: False
If no errors, commit inserted & updated records?BooleanSet to True if you want the action to upsert the record(s) if there are no errors
Optional, Default: False
OUTPUT
isErrorBooleanTrue if there were any errors
errorMessagesStringA single string that includes the error message for each failing record
firstInsertedIdStringIf the commit attribute is set to True and there are no errors, this will be the recordId of the first inserted record 
insertedIdCollectionString CollectionIf the commit attribute is set to True and there are no errors, this will be a String collection of the recordIds of all of the inserted records

Notes

  • Prior to Summer ’21, there is a Salesforce bug that will cause a validation error when the record being inserted has values in any picklist fields

Installation

Production or Developer Version 1.6

Sandbox Version 1.6


Release Notes

6/12/21 – Eric Smith – v1.6

Added custom SVG image for the flow builder canvas (auto-layout only)

5/5/21 – Eric Smith – v1.5

Automatically disables the duplicate check option on inserts of more than 150 records to avoid a “too many DML statements” error

4/30/21 – Eric Smith – v1.4

Fixed default value for Commit Records to be False

3/27/21 – Eric Smith – v1.3

Fixed the default values for the optional attributes

3/13/21 – Eric Smith – v1.2

Added optional attribute to run Duplicate Rule check when adding records.


Previous Versions

Production or Developer Version 1.5

Sandbox Version 1.5

Production or Developer Version 1.4

Sandbox Version 1.4

Production or Developer Version 1.3

Sandbox Version 1.3

Production or Developer Version 1.2

Sandbox Version 1.2

Production or Developer Version 1.1

Sandbox Version 1.1


View Source

Source Code

Hydrate Ids into Records with ‘Get Records From Ids’

The Collection Actions package of utility actions now has a new action that takes a collection of recordIds (i.e. a List of Strings) and returns the corresponding records. It carries out a SOQL query and obtains the fields that you specify by name.

In this example, I start out with a collection of AccountTeamMembers to whom I want to send emails. To get their email addresses, I need to obtain the User records that correspond to each AccountTeamMember. I can do that by pairing these two actions:

The first action is Extract Strings from Collections, which is also available in the Collection Actions package. I use this to convert the AccountTeamMembers into a List of User Ids. Then I ‘hydrate’ the User Ids into User records.

Learn more about Get Record from Ids.

Install Collection Actions here.

Datatable – New Version Release Notes

Eric Smith has released Version 3.0.10 of the Datatable Flow Screen component. Here are the Feature Updates & Bug Fixes included in this release.

Updates:

  • Record links have been updated to now support a Flow running in a Community
  • Added a new Table Behavior option to specify if Links should open in the same Tab
  • You can now use a Flow variable to set the Maximum Number of Rows value
  • Changed the display of error messages to match the Salesforce standard
  • Allow all TypeAttibute settings for Date fields (This will switch datetime fields to UTC)
  • Added a Permission Set that gives access to the @AuraEnabled Apex Classes that are part of the Datatable Flow Screen LWC

Bug Fixes:

  • Fixed incorrect links when running in a Sandbox whose name started with the letter c
  • Now longer require the Checkbox column if any columns are selected for editing
  • Reset the Number of Rows Selected to 0 when clearing the row selections
  • Retain the new setting when clearing a checkbox in the CPE
  • Fixed an error when trying to exit the CPE after selecting the Apex Defined Object option
  • Fixed the delay that occurred when selecting a large (>200) number of records
  • Fixed the delay that occurred when editing multiple (>20) records
  • Fixed an issue with being unable to edit Apex-Defined columns unless Type was specified
  • Made sure that the Key Field could not be edited
  • Now regular Textarea fields of 255 characters or less can be edited

This update requiresย FlowScreenComponentsBasePackย Versionย 2.1.6ย or later.

Save and Update Custom Metadata Records Using Flow

Jonathan Gillespie created a nifty action that lets you Create and Update Custom Metadata records from within Flow – something not possible out of the box. Check it out over at his GitHub account: https://github.com/jongpie/CustomMetadataSaver 

When do you use Custom Metadata?

Custom Metadata is an extremely powerful feature that lets you control core logic from code and automations declaratively. Here is a great article/video from 2018โ€™s Dreamforce that shows how you can utilize Custom Metadata in Flow and when you should use it: https://admin.salesforce.com/blog/2018/advanced-automation-with-flows-and-custom-metadata-types-webinar-recap 

From the article – Use Custom Metadata when:

  • Application or Org data are referenced in multiple places in your org
  • Manage mappings like a โ€˜State โ†’ Tax Rateโ€™ or the DeveloperName/Email address of a specific user/Group
  • Manage information that is subject to change or will change frequently
  • Store frequently used text like a task descriptions, chatter description, or notification contents
  • Store environment variables (URLs, things specific to each Salesforce environment)*

I can see two key use cases for this action:

  1. Giving power users and key decision makers the ability to control business logic without admin intervention and without giving them โ€˜Customize Applicationโ€™ access. 
  2. Creating custom metadata records with complex logic – perhaps based on record data 

For mass-creating CMT records from Flow from a CSV file I recommend trying Narender Singhโ€™s action posted last week.

Install & Setup

To install, use the โ€˜Deploy to Salesforceโ€™ button in the README section of the repo. NOTE: Jonathan is working on email alert notifications for when the deploy succeeds or fails: https://github.com/jongpie/CustomMetadataSaver/pull/9

Check out a video of it in action

Flow Community Development Overview “Flowcast” – Feb. 2021

Check out what went on in the Flow development community in the month of February! This highlight video will cover various posts from here on UnofficialSF as well as other components and actions found online.

Have something cool to share? Post a link in the comments thread!

Spring 21โ€™ Links

Other Links

Integrate Slack using Flow Actions

Slack invocable actions provide portable functionality that can be invoked via REST or used as point-and-click building blocks in Flow Builder, Bot Builder, and Strategy Builder.

  • Create Slack Channel
  • Invite User to Slack Channel (up to 1000 user IDโ€™s)
  • Kick User from Slack Channel
  • Post to Slack (both plain text and full Slack markdown)
  • Archive Slack Channel
  • Get All Slack Channels
  • Get Slack Channel Members

There are many use cases for these actions:

  1. You can use Flow to streamline Slack administration. The package comes with a flow called Slack Administrator that streamlines the management of Slack channels and shows how these actions can be combined together.

Here’s what this flow looks like in the Flow Builder:

Watch this video to see it in action:

Use Case 2

Trigger on a Schedule or a Record Change using Flow Builder and use these actions to do something in Slack. Note that you currently have to use the dynamic technique shown here. Basically, you put the trigger in flow 1 and have it dynamically launch flow 2, where you put your Slack actions. (There are plans in the works for improving this situation)

Use Case 3

Spinning up channels for particular circumstances, such as the creation of a case or a deal opportunity. Your flow can create the channel and invite the right group of people. For this, you’ll probably want to have a User field that contains the user’s Slack Id.

How It Works

To learn about the different inputs, take a look at api pages like this one: https://api.slack.com/methods/chat.postMessage

To create rich Slack messages, you assemble JSON strings in the Slack format, which they call Block Kit. You then pass the strings into these actions. You can construct them here (https://app.slack.com/block-kit-builder/) and then copy and paste the json (everything inside the [ ]) into a Text Template or action input. You can insert merge fields (references that look like {!this}) and Flow will replace the merge fields with the appropriate values when the flow is executed. If you don’t want to deal with blocks, you can send plain text in the ‘text’ input. Note that the ‘text’ input is used in notification pop ups.

thread_ts is used when you want to instruct Slack that the message you’re posting is a response to a previous message. If you know the thread_ts value for the previous message (it’s basically a message id) and you provide it, Slack will make the new message a child of the old message.

Install

Step 1) Install Required Package Dependencies

Target orgs need to have the following package dependencies installed, in order:
Install: Flow Actions Base Pack version 3.0 or higher
Install: Flow Screen Components Base Pack version 3.0.6 or higher
Install: Datatable version 4.0.3 or higher

Note however that these dependencies are only used for the sample harness flow “Salesforce Slack Administrator”. (If youโ€™d rather have a package that doesnโ€™t include this flow and require these dependencies, let us know.)

Step 2) Install the Slack Actions

Version 3.0 Unlocked 4/17/22

Step 3) Obtain an Authentication Token from your Slack Workspace

In order for your Slack Actions to be allowed to interact with your Slack workspace, you need to generate an authentication token. They look like this:

Notice the picklist in the upper left. It is set to a specific Slack Action (in this case, the app is called ‘InvocableActionBridge’. If you have sufficient permission to create an app on the workspace you’re targeting, you can generate a token by creating your own Slack App from here:

https://api.slack.com/apps

“Creating an App” may sound intimidating, but this isn’t a situation where you need to write code or create logic. A Slack App can be as simple as what we’re needing here: a simple token generator that gives you a token that you can use to access Slack.

In addition to generating your Bot User OAuth token on the Oauth and Permission page, as shown above, you need to scroll down on that page and add scopes to that token. Each scope allows the token to be used for a different chunk of apis. For example, here are the scopes I’ve assigned to my current Bot User OAuth token:

If you find yourself getting errors like this:

An Apex error occurred: CreateSlackChannel.InvocableActionException: error Creating Slack Channel: Error from Slack: missing_scope”

…return to this page and add the appropriate scope.

Reference: Post to Slack

Inputs

text
stringthis is plain text. if you don’t specify a ‘blocks’ value, this will be used.
blocksstringthis is used for text formatted using Slack Block Kit.
channelIdstringrequired.
tokenstring
thread_ts;stringthis is a timestamp that can be used as a thread Id. You receive them back on initial posts and can resubmit them with additional posts to maintain a thread.
usernamestring
attachmentsstring
unfurl_linksstring

Outputs

okstring
errorMessagestring
timeStampstring

View Source

Source

Version 3.0 Unlocked 4/17/22 (usf3 compliant)

Old version

Version 1.1.1 Unlocked 7/22/21 (better error reporting fix)

Version 1.1.0 Unlocked 3/8 (bug fixes)

Version 1.0.0 Unlocked 3/1